
Are you tired of wrestling with your Diaper Genie every time you need to change the bag? You’re not alone!
Many parents face the same challenge. It’s crucial to keep your nursery smelling fresh and clean, and a full Diaper Genie can quickly spoil that. Imagine a hassle-free, quick process that saves you time and frustration. You’ll discover simple steps to master the art of changing the bag in your Diaper Genie.
We’ll walk you through each step, making sure you gain confidence and speed in handling this task. Say goodbye to unpleasant odors and hello to a fresh nursery environment. Keep reading, because your nursery maintenance is about to get a whole lot easier!
Gather Necessary Supplies
Prepare the supplies before changing the bag on your Diaper Genie. Have a new refill, scissors, and wipes ready. Keep the area tidy for a smooth process.
Gathering the necessary supplies is a crucial step in changing the bag on your Diaper Genie effectively. Ensuring you have everything ready can make the process smoother, quicker, and less messy. No one wants to be in the middle of changing a bag only to realize they’re missing a vital item. So, let’s set the stage right and make your diaper changing routine as hassle-free as possible.
Check Your Diaper Genie
Before diving into the bag-changing process, take a moment to inspect your Diaper Genie. Is it almost full? Are there any blockages or issues you need to address? A quick check can save you from unexpected surprises.
Get The Right Refills
Not all refills are created equal, and using the right ones for your Diaper Genie is essential. Make sure you have compatible refills on hand. Look for the label or model number on your Genie to match with the refill pack. Nothing is worse than realizing you have the wrong size mid-change!
Keep Sanitizing Supplies Handy
Diaper changing can be a messy affair. Having sanitizing wipes or spray nearby can help you keep the area clean and germ-free. A quick wipe down before and after changing the bag ensures cleanliness and hygiene.
Have A Disposal Plan
Once you remove the old bag, you’ll need to dispose of it properly. Have a trash bag ready or know where your nearest waste bin is located. Consider the environment and opt for eco-friendly disposal options if possible.
Prepare For Unexpected Situations
What if the bag tears? Or you spill a little mess during the change? Keeping paper towels or an old newspaper nearby can be your saving grace. It’s always better to be over-prepared than under-equipped. Changing the bag on your Diaper Genie doesn’t have to be a daunting task. With these supplies at your fingertips, you’re setting yourself up for success. Are there any other supplies you think would make the process even more seamless?
Credit: www.youtube.com
Prepare The Diaper Genie
Changing the bag on a Diaper Genie can seem daunting. Preparing the Diaper Genie properly is crucial for a seamless experience. This ensures a clean and fresh nursery environment. Follow these steps to get started with confidence.
Find a flat surface to work on. This makes handling easier. Keep the Diaper Genie upright during the process. It prevents spills and messes. Ensure the area is well-lit. Good visibility helps you see every detail.
Have new Diaper Genie refills ready. Check they are the correct size. Keep a pair of scissors handy. They help cut the refill packaging easily. Also, have cleaning wipes nearby. Use them to clean the Genie if needed.
Remove The Lid
Press the button to unlock the lid. Lift it gently. Avoid forcing it open. This prevents damage to the Genie. Place the lid aside carefully. Keep it within reach for easy reattachment.
Check The Current Bag
Look inside the Genie. Check if the bag is full. If it’s not full, assess its condition. Decide whether it needs changing. This saves time and effort.
Dispose Of The Old Bag
Seal the old bag securely. Use the built-in cutter to trim the bag. Tie the end tightly. Prevent odor and spills. Dispose of the bag in a trash bin. Ensure it’s out of reach of children and pets.
Open The Lid
Open the lid of your Diaper Genie by pressing the button on the front. Pull the bag through the cutter, then tie a knot in the replacement bag. Close the lid securely to finish the process.
Opening the lid of your Diaper Genie might seem straightforward, but doing it correctly can save you time and ensure the system functions effectively. Imagine this: it’s 3 a.m., your baby is finally asleep, and you’re trying to change the diaper pail liner quietly. Mastering this step can make those moments a little smoother. Let’s get into the nitty-gritty of how to open the lid on your Diaper Genie without a hitch.
Understanding The Mechanism
The lid of the Diaper Genie is designed for ease of use. Press the latch on the front of the lid gently. This latch releases the lock and allows the lid to open smoothly. Did you notice any resistance? Ensure you’re pressing the latch fully for a seamless experience.
Keeping It Clean
Regularly cleaning the lid can prevent sticky situations. Wipe the surface and latch area with a damp cloth. This prevents build-up that could hinder the lid’s movement. A clean lid also helps maintain a fresh smell, complementing the Genie’s odor-trapping design.
Handling With Care
Gentle handling is key. Avoid forcing the lid open or closed, as this can damage the latch mechanism. Apply light pressure when closing to ensure it locks securely. Have you ever found the lid slightly ajar? Double-check that it clicks shut to maintain the airtight seal.
Check For Obstructions
Sometimes, the lid might not open smoothly due to obstructions. Look for any foreign objects caught in the hinge or latch area. Have you ever dropped a toy or wipe into the pail? Clear these out to ensure the lid operates without a hitch.
Practice Makes Perfect
Take a moment to familiarize yourself with the lid mechanism when you’re not in a rush. Practicing during calm moments can make the process quicker when you’re in a hurry. Have you ever noticed how muscle memory kicks in during those late-night changes? This small investment in time pays off during those bleary-eyed hours. Opening the lid of your Diaper Genie is more than just a step in changing the bag—it’s about maintaining efficiency and peace of mind. How do you make sure your Diaper Genie is ready for those nighttime emergencies?
Credit: www.tiktok.com
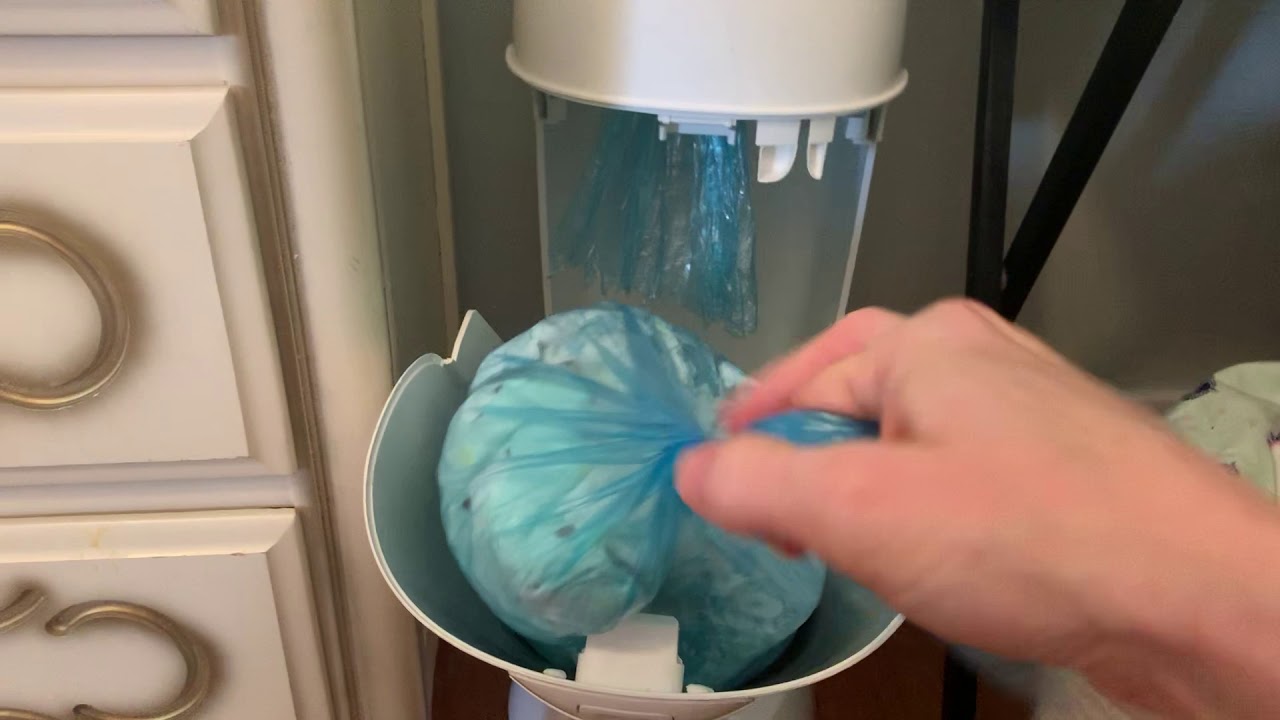
Remove The Full Bag
Emptying your Diaper Genie is easy with a few simple steps. First, locate the full bag. This step is crucial for maintaining a fresh nursery. Regularly changing the bag keeps odors at bay. Ready to learn more? Let’s dive in.
Step 1: Open The Lid
Press the button on the front of the Diaper Genie. The lid will pop open. This reveals the full bag inside.
Step 2: Cut The Bag
Find the built-in cutter inside the unit. Use it to cut the bag. This allows you to easily remove the filled section.
Step 3: Tie The Bag
Once cut, tie a secure knot at the top. This prevents any leaks or spills. A simple knot will do the trick.
Step 4: Dispose Of The Bag
Remove the tied bag from the Diaper Genie. Dispose of it in your outdoor trash bin. This keeps your home smelling fresh.
Step 5: Prepare For A New Bag
Pull down a new section of the bag. Tie a knot at the bottom. This prepares the Diaper Genie for more diapers.
Step 6: Close The Lid
Securely close the lid of the Diaper Genie. Ensure it’s locked properly. This keeps odors contained.
Tie Off The Bag
Changing the Diaper Genie bag requires a simple process. Start by opening the lid and pulling out the full bag. Tie off the bag securely to prevent any mess, then cut it using the built-in cutter. Finally, pull down a new section of the refill and tie a knot at the bottom to prepare for next use.
Changing the bag on a Diaper Genie might seem like a daunting task, but it’s simpler than you think! The key step is knowing how to tie off the bag correctly. This ensures that all those used diapers stay sealed away, preventing odors from escaping. Having mastered this step myself, I can assure you that once you get the hang of it, you’ll never have to worry about unpleasant surprises again. Let’s dive into how you can tie off the bag confidently and efficiently. When you’re ready to change the bag, make sure you have a fresh refill on hand. Begin by pulling the bag down to a comfortable length, approximately knee-high. This gives you enough space to tie it securely without it being too short or too long. Next, twist the top of the bag several times. A few firm twists create a tight seal, ensuring that no odors escape.
Ensure A Tight Knot
Once twisted, hold the twisted section firmly and create a knot. Loop the twisted section into a knot as if you were tying a balloon. This knot should be tight enough to prevent any leaks, but not so tight that it becomes impossible to untie later. Consider using a double knot for added security. This extra step can be a lifesaver, especially on warmer days when odors can be more intense.
Check For Leaks
After tying, inspect the knot closely. Check for any gaps or loose sections. If you notice any, retie the knot tighter. A quick test is to gently tug on the knot to ensure it’s secure. This small effort can save you from unexpected odors later.
Reflect On Your Experience
Think back to the first time you changed a Diaper Genie bag. Did you struggle with the knot? If so, remember that practice makes perfect. Each time you change the bag, you’ll become more efficient. Could you share your own tips for tying off the bag? Your insights might help other parents facing the same challenge. The next time you change the bag, try these steps and see how they transform your experience. What might you do differently?
Insert A New Bag
Changing the bag in a Diaper Genie might seem daunting. But with a few simple steps, you’ll be done in no time. The process is straightforward and ensures your Diaper Genie continues to keep unpleasant smells at bay. Follow these instructions to insert a new bag efficiently.
Open The Diaper Genie
Start by opening the Diaper Genie. Press the button or latch to release the top. This gives you access to the bag holder. Make sure the area is clean and ready for the new bag.
Remove The Old Bag
Pull out the old bag carefully. Tie it off securely to prevent spills. Dispose of it according to your local waste guidelines. Double-check the holder for cleanliness before inserting the new bag.
Prepare The New Bag
Take a new refill bag from its packaging. Unroll it gently, ensuring it doesn’t tear. Make sure the bag is ready to be placed inside the holder. You want a smooth, seamless insertion.
Insert The New Bag
Place the new bag into the holder. Align it properly to avoid any leaks. Push it down until it’s secure. This ensures effective use and maintains freshness in the nursery.
Secure The Bag
Twist the top to lock the bag in place. This keeps the bag from slipping. Check that it’s tight and secure. Your Diaper Genie is now ready to tackle dirty diapers once again.
Close the top securely. Make sure it clicks shut. The Diaper Genie is ready for action. No more lingering odors in your baby’s room.
Secure The New Bag
Changing the bag on a Diaper Genie is simple and quick. Open the lid, remove the old bag, and pull down a new one. Secure it in place, ensuring no gaps for odors to escape.
Changing the bag on your Diaper Genie might seem like a mundane task, but it’s a crucial step in maintaining a fresh and odor-free nursery. After removing the old bag, securing the new one correctly ensures that the Diaper Genie performs its best. A well-secured bag prevents unpleasant smells from escaping and keeps everything tidy. Let’s dive into how you can secure the new bag effortlessly.
Prepare The Bag
Before securing the new bag, ensure you have a clean, empty bag ready. Make sure there are no tears or holes. A damaged bag might defeat the purpose of controlling odor. Double-check the bag’s seal and prepare for a smooth transition.
Position The Bag
Now, position the new bag inside the Diaper Genie. Place the bag so that it naturally unfolds. This helps in easily gathering the used diapers without any hassle. Ensure the bag hangs freely and isn’t twisted.
Secure The Bag Rim
Once the bag is properly positioned, the next step is to secure the rim. Pull the top edge of the bag over the rim of the Diaper Genie. This ensures the bag won’t slip down when you add diapers. A tightly secured rim keeps everything in place.
Seal The Bag Bottom
The final step involves sealing the bottom of the bag. Tie a knot at the end, ensuring it’s tight enough to hold the weight of the diapers. A secure bottom prevents any mess from leaking out.
Test The Setup
After securing the bag, test it by gently pushing on it. You should feel resistance if it’s secured properly. This small test gives you peace of mind and ensures that everything is in order for the days ahead. Have you ever wondered how a simple knot can make a difference in maintaining your nursery’s freshness? It’s these small steps that make parenting smoother. With the new bag secured, you can rest easy knowing your Diaper Genie is ready to tackle whatever comes its way.
Close The Diaper Genie
Changing the bag on a Diaper Genie can be straightforward. A crucial step is properly closing the Diaper Genie. This ensures odors stay contained and the space remains fresh. Understanding each step helps achieve a seamless change.
Seal The Bag
Twist the top of the new bag tightly. This prevents odors from escaping. Ensure a snug fit before proceeding to the next step.
Secure The Lid
Align the lid with the top of the Diaper Genie. Press down firmly until you hear a click. This sound confirms the lid is locked in place.
Check For Gaps
Inspect the edges of the lid for any gaps. Gaps can let odors out. Adjust the lid if needed for a tight seal.
Final Touch
Give the Diaper Genie a gentle shake. This helps settle the bag inside. A well-set bag allows for optimal odor control.
Tips For Efficient Bag Changing
Changing the bag on a Diaper Genie might seem tricky. But with the right tips, it becomes a simple task. Knowing the best practices can save time and keep your nursery fresh. Let’s explore some efficient ways to change your Diaper Genie bag.
1. Gather Your Supplies First
Always have a new bag ready before you start. This ensures a quick switch without hassle. Keep spare bags close to your Diaper Genie for easy access.
2. Choose The Right Time
Pick a time when your baby is occupied or asleep. This prevents interruptions and makes the task quicker. A calm environment helps you focus on the task.
3. Use A Consistent Method
Develop a routine for changing the bag. Follow the same steps each time. This builds muscle memory and speeds up the process.
4. Check For Bag Fullness
Don’t wait until the bag is overflowing. Change it when it’s moderately full. This keeps odors at bay and makes the task less messy.
5. Secure The Bag Properly
Ensure the new bag is tightly secured to avoid leaks. Double-check the seal before closing the lid. A well-secured bag keeps the nursery smelling fresh.
6. Dispose Of The Old Bag Correctly
Seal the old bag tightly to trap odors. Dispose of it in an outdoor bin quickly. This keeps your home smelling pleasant.
7. Maintain Cleanliness
Wipe down the Diaper Genie after each bag change. Use a mild disinfectant to clean the surface. Regular cleaning prevents bacteria buildup.
8. Educate Other Caregivers
Ensure all caregivers know the bag-changing routine. A consistent approach benefits everyone. It ensures the Diaper Genie is always ready for use.
Troubleshooting Common Issues
Changing the bag on a Diaper Genie can be tricky. First, open the lid and push down the old bag. Cut the bag using the built-in cutter. Tie a knot at the new bag’s end and pull it through. Securely close the lid, ensuring the bag is properly set.
Changing the bag on your Diaper Genie can sometimes be more complicated than it seems. Whether you’re a new parent or a seasoned pro, encountering hiccups with this task is common. Addressing these issues not only saves you time but also ensures your Diaper Genie remains effective in keeping odors at bay.
Bag Won’t Stay In Place
If you find the bag slipping or not staying in place, you might not be securing it properly. Ensure the bag is fully extended before placing it in the Genie. A snug fit prevents the bag from falling when you close the lid.
Bag Gets Stuck
A stuck bag can be frustrating, especially when you’re in a hurry. Check if the bag is overfilled, as this is a common cause. Reducing the contents can sometimes make it easier to remove.
Difficulty Cutting The Bag
Cutting the bag efficiently is crucial for a clean change. Ensure the cutter blade inside the Genie is not dull. If it is, it might be time to replace the unit or find a workaround with scissors for a temporary fix.
Odors Persist Despite Changing The Bag
If odors linger, even with a fresh bag, it might not be the bag that’s the issue. Clean the interior of the Genie regularly to prevent buildup that contributes to smells. How often do you clean your unit?
Lid Won’t Close Properly
A lid that doesn’t close can render the Genie ineffective. Ensure there’s no obstruction and the bag isn’t too full, which can prevent the lid from shutting completely. Adjusting the bag or emptying it sooner can solve this.
Bag Tearing Easily
If the bag tears during removal, it could be due to sharp objects inside. Check for any exposed diaper tabs or pins that might be causing damage. Using diapers without sharp edges can prevent this issue.
Bag Ring Doesn’t Fit
A misfit bag ring can disrupt the entire process. Confirm that you’re using the right size and brand recommended for your Genie model. Compatibility ensures seamless bag changes. Encountering these common issues might seem daunting, but they’re often easy to fix with a little attention to detail. Have you ever faced any of these problems? Share your experiences and solutions to help fellow parents.

Credit: www.wikihow.com
Frequently Asked Questions
How Do I Change The Bag On A Diaper Genie?
To change the bag on a Diaper Genie, open the lid and pull out the old bag. Cut the bag using the built-in cutter, tie a knot at the top, and dispose of it. Pull down the new bag, tie a knot at the bottom, and secure it inside.
How Often Do You Change Your Diaper Genie Bag?
Change your Diaper Genie bag every 2-3 days or when it’s full. This ensures odor control. Regular changes maintain hygiene and prevent unpleasant smells. Always check the bag’s fullness to decide the best time for a change. Doing so keeps your nursery fresh and clean.
How To Install A Diaper Genie Signature Bag?
Remove the top of the Diaper Genie. Push the bag through the hole. Tie a knot at the end. Place the bag inside. Close the lid securely.
How Many Bags Are In The Diaper Genie Refill?
Diaper Genie refills typically contain seven bags. Each bag can hold up to 270 diapers. This efficient system helps keep nurseries odor-free and clean. Make sure to check the packaging for specific details, as variations might occur.
Conclusion
Changing the Diaper Genie bag is simple with these steps. First, ensure you have the right bag size. Remove the old bag carefully to avoid spills. Attach the new bag securely to prevent leaks. Make sure it’s in place before closing the lid.
Practice a few times to get comfortable. Keeping your Diaper Genie clean will help too. Regularly check for any issues to maintain efficiency. These tips make diaper disposal easy and stress-free. Enjoy a cleaner, fresher nursery every day.

Emma Grace is a devoted mother and passionate content writer at BestBabyCart.com. With firsthand parenting experience and a love for research, she creates helpful guides and honest reviews to support parents in choosing the best for their babies. Her goal is to make parenthood easier, one article at a time.