Taslima Khanam Sultana, a loving mom of three, founded BestBabyCart.com to help new parents navigate the world of baby products with ease. Her passion for making parenting simpler shines through delivering honest, unbiased reviews on must-haves like diapers, strollers, and feeding gear. Taslima’s mission is to empower families with expert tips, ensuring every product is safe and top-quality for your little one. Drawing from her own parenting journey, she’s dedicated to supporting yours!
Baby tears, also known as Hemianthus callitrichoides, are a popular choice for aquarium enthusiasts. They provide a lush, green carpet that enhances the beauty of any tank.
But how much do baby tears cost for Amano shrimp? The price of baby tears can vary depending on several factors. These include the size of the plant, where you buy it, and whether it is sold in a pot or as a bunch.
Typically, you can expect to spend anywhere from $5 to $20 for a small portion. Understanding the cost helps in planning and maintaining a beautiful habitat for your Amano shrimp. Let’s dive deeper into what influences the price and why baby tears are a great choice for your aquatic friends.
Introduction To Baby Tears
Baby Tears, known scientifically as Hemianthus callitrichoides, are a popular plant in the aquarium hobby. These tiny, delicate plants are loved for their vibrant green color and ability to form a dense carpet. They are a favorite choice for aquascaping, creating lush, green landscapes inside tanks.
What Are Baby Tears?
Baby Tears are small, creeping plants that grow to about 1-2 inches tall. They have tiny, round leaves that form a mat-like appearance. These plants thrive in high light conditions and benefit from CO2 supplementation. They are often used in the foreground of aquariums to create a vibrant green carpet.
Characteristic
Details
Scientific Name
Hemianthus callitrichoides
Common Name
Baby Tears
Height
1-2 inches
Light Requirement
High
CO2 Requirement
High
Importance In Aquariums
Baby Tears are essential for creating a natural look in aquariums. They provide hiding spots for small fish and shrimp, making the environment more comfortable and less stressful for these creatures. The dense growth of Baby Tears also helps to keep the water clean by absorbing nutrients that might otherwise fuel algae growth.
Here are some key benefits of Baby Tears in aquariums:
Enhances Aesthetic Appeal: Their vibrant green color adds beauty.
Provides Hiding Spots: Small fish and shrimp feel safer.
Improves Water Quality: Absorbs excess nutrients, reducing algae.
Supports Biofilm: Essential for shrimp like Amano shrimp.
Baby Tears are particularly beneficial for Amano shrimp. These shrimp feed on the biofilm that forms on the leaves and roots. This biofilm is a natural food source, contributing to the shrimp’s health and well-being.
In summary, Baby Tears are a versatile and attractive plant that offers numerous benefits to aquarium ecosystems.
Amano Shrimp And Baby Tears
Amano Shrimp are popular in aquariums. They help keep the tank clean. Baby Tears, a type of plant, is often paired with these shrimp. This pairing creates a beautiful and functional habitat.
Compatibility With Amano Shrimp
Baby Tears are compatible with Amano Shrimp. These plants grow quickly and provide shelter. Shrimp can hide among the leaves.
Baby Tears also add oxygen to the water. This is good for the shrimp. The plants grow in small, tight clusters. This makes them perfect for small tanks.
Benefits For Shrimp Habitat
Baby Tears offer many benefits to Amano Shrimp. They help keep the water clean. The plants absorb harmful nutrients. This creates a healthier environment.
Baby Tears also provide a food source. Shrimp like to graze on the biofilm that grows on the leaves. This helps the shrimp stay healthy.
Here are some key benefits:
Provides shelter and hiding places
Adds oxygen to the water
Absorbs harmful nutrients
Offers a food source
Benefit
Details
Shelter
Provides places for shrimp to hide
Oxygen
Increases oxygen levels in the water
Nutrient Absorption
Removes harmful nutrients from the water
Food Source
Grows biofilm for shrimp to eat
Factors Influencing Baby Tears Pricing
Understanding the pricing of Baby Tears for Amano Shrimp involves various factors. The cost can fluctuate based on several key elements. These factors can significantly impact the overall price you pay for these aquatic plants. Let’s examine the key factors that influence Baby Tears pricing.
Plant Quality
The quality of Baby Tears plants plays a significant role in determining their pricing. Healthy, vibrant plants with strong roots often cost more. High-quality plants tend to be free from pests and diseases. They also have a longer lifespan in your tank.
Low-quality plants may be cheaper but might not thrive well. They can also introduce unwanted pests into your aquarium. Investing in high-quality plants ensures better growth and health for your Amano Shrimp.
Seller Reputation
The reputation of the seller also affects the price. Well-known sellers with positive reviews may charge more. They often provide better quality plants and reliable service. Trusted sellers usually offer guarantees on their plants, adding value.
Buying from less reputable sellers can be risky. Prices might be lower, but the quality could be compromised. Checking reviews and ratings helps ensure you get the best value for your money.
Average Cost Of Baby Tears
Understanding the average cost of Baby Tears is essential for aquarists. These small, delicate plants add beauty to your aquarium. Knowing the price range helps you budget better for your tank setup.
Price Ranges
Baby Tears, also known as Hemianthus callitrichoides, vary in price. On average, you can expect to pay between $5 and $15 per small portion. The cost depends on factors such as size, condition, and seller location.
Size
Average Cost
Small Portion
$5 – $10
Medium Portion
$10 – $15
Large Portion
$15 – $20
Comparing Different Markets
It’s useful to compare prices from different sellers. Online markets often offer more variety and competitive prices. Local pet stores might have higher prices but provide fresh plants.
Online Stores: Often cheaper, more variety.
Local Pet Stores: Fresh plants, higher prices.
Consider the shipping costs when buying online. Sometimes, they can outweigh the savings. Local stores let you inspect the plants before buying, ensuring they are healthy
Buying Baby Tears Online Vs. In-store
Baby Tears are essential also known as Hemianthus callitrichoides, are popular in aquariums. Especially for Amano Shrimp. These tiny plants create a beautiful carpet in tanks. When buying Baby Tears, you have two options: online or in-store. Each option has its own benefits.
Advantages Of Online Purchase
Buying Baby Tears online offers convenience. You can shop anytime from home. Online stores often have a wider selection. You might find rare plant varieties. Many websites also provide detailed plant care information. Customer reviews can help you make informed choices. Online prices are often lower. Seasonal sales and discounts are frequent. Delivery services bring plants directly to your door.
Benefits Of In-store Purchase
Buying Baby Tears in-store allows you to see the plants. You can check their health and quality. Store staff can give you advice and tips. They might offer personalized recommendations. You can also buy other supplies at the same time. Instant gratification is another perk. You take the plants home immediately. No waiting for delivery.
Tips For Finding Affordable Baby Tears
Finding affordable baby tears for your Amano shrimp can be challenging. Prices can vary based on several factors. But there are ways to get the best deals. Here are some tips to help you find affordable baby tears.
Seasonal Discounts
Stores often offer discounts during certain seasons. For example, spring and summer may have sales on aquatic plants. Keep an eye out for these seasonal sales. Sign up for newsletters from your favorite stores. They often send out notifications about upcoming discounts.
Bulk Purchasing
Buying in bulk can save you money. Many online stores offer discounts for larger purchases. Check if your local pet store has bulk options. Sharing a bulk purchase with friends can also reduce costs. This way, everyone benefits from the savings.
Maintaining Baby Tears In Your Aquarium
Maintaining Baby Tears in your aquarium can create a lush, green landscape. This plant, with its small, round leaves, adds beauty and provides hiding spots for Amano shrimp. Keeping Baby Tears healthy ensures your aquarium stays vibrant and clean.
Proper Planting Techniques
Start with healthy Baby Tears from a trusted source. Divide the plant into small clumps. Plant each clump in nutrient-rich substrate. Bury the roots but keep the leaves exposed. Space the clumps evenly to allow growth and spread. Use tweezers for precise planting.
Regular Care And Maintenance
Provide adequate light to Baby Tears for at least 8 hours daily. Use LED lights for consistent and bright illumination. Check water parameters frequently. Maintain a temperature between 72-82°F and a pH of 6.0-7.0. Trim the plant regularly to prevent overgrowth. Remove any dead or decaying parts to keep the tank clean. Fertilize the plant with liquid fertilizers weekly. Monitor CO2 levels as Baby Tears need CO2 for optimum growth.
Frequently Asked Questions
What Are Baby Tears For Amano Shrimp?
Baby tears are a type of aquatic plant. They provide hiding spots and enhance the tank’s aesthetic.
How Much Baby Tears Do Amano Shrimp Need?
A small patch of baby tears is sufficient. Amano shrimp don’t require large amounts for their habitat.
Why Use Baby Tears In Shrimp Tanks?
Baby tears create a natural environment. They offer hiding spots and help maintain water quality.
Can Baby Tears Affect Water Quality?
Yes, baby tears improve water quality. They absorb nitrates and provide oxygen, benefiting the shrimp.
Conclusion
Baby Tears can be a great plant for Amano Shrimp. It provides a natural habitat. It enhances your tank’s beauty. Baby Tears also helps maintain water quality. The cost varies based on location and quantity. Always buy from reputable suppliers.
This ensures quality and healthy plants. Happy shrimp and a beautiful tank await. Keep exploring and enjoy your aquarium journey!
Taslima Khanam Sultana, a loving mom of three, founded BestBabyCart.com to help new parents navigate the world of baby products with ease. Her passion for making parenting simpler shines through delivering honest, unbiased reviews on must-haves like diapers, strollers, and feeding gear. Taslima’s mission is to empower families with expert tips, ensuring every product is safe and top-quality for your little one. Drawing from her own parenting journey, she’s dedicated to supporting yours!
Struggling with engorged breasts while breastfeeding? 😊 This guide explains why engorgement happens, offers simple relief tips like warm compresses and frequent nursing, and shares prevention strategies. Find expert advice and visuals to ease discomfort fast!
Hey, mamas! 😄 I’m a mom running BestBabyCart.com, and I remember those early breastfeeding days when my breasts felt like overfilled water balloons—ouch! Engorgement is common, but it can feel overwhelming. Questions like “Why are my breasts so hard?” or “How do I get relief?” pop up fast. Don’t worry—this mom-to-mom guide on how to manage engorgement breastfeeding has you covered. With practical tips, soothing visuals, and trusted advice, you’ll find comfort and confidence. Let’s tackle engorgement together!
What Is Breast Engorgement?
Engorgement happens when your breasts become overly full of milk, making them hard, swollen, and painful. It’s common in the first 3–5 days after birth as your milk “comes in,” per La Leche League, but can occur later too.
Why It Happens: Milk supply increases to meet baby’s demand, or missed feedings cause buildup.
Why It Matters: Understanding the cause helps you find relief.
Symptoms: Tight, shiny skin; warm, heavy breasts; flattened nipples.
Why It Matters: Recognizing signs lets you act quickly.
How Long It Lasts: Usually 24–48 hours with proper management.
Why It Matters: Relief is near with the right steps!
About 1 in 3 breastfeeding moms experience engorgement, per CDC, so you’re not alone. Let’s explore how to ease the discomfort!
Why Does Engorgement Happen?
Understanding the causes helps you manage and prevent engorgement. Here are the main triggers:
Milk Supply Transition
When: Days 3–5 postpartum, milk shifts from colostrum to mature milk.
Why It Matters: Sudden milk surge fills breasts faster than baby can drink.
How It Feels: Breasts feel rock-hard and tender.
Why It Matters: Signals your body’s adjusting to breastfeeding.
Missed or Irregular Feedings
When: Baby sleeps longer, or you skip pumping.
Why It Matters: Milk builds up, causing pressure.
Example: Missing a night feed when baby sleeps 6 hours.
Why It Matters: Helps you plan feeding schedules.
Weaning or Reduced Nursing
When: Baby starts solids or you wean.
Why It Matters: Less milk removal leads to fullness.
How to Avoid: Gradually reduce feedings, per American Academy of Pediatrics.
Why It Matters: Needs attention to avoid mastitis.
Overstimulation: Too much pumping increases supply.
Why It Matters: Balance pumping with baby’s demand.
How Does It Feel?
Engorgement can make your breasts feel:
Hard or tight
Warm or hot to the touch
Painful or tender
Heavy, with stretched, shiny skin
You might also notice flattened nipples, making it harder for your baby to latch.
Prevention Strategies
Breast engorgement can be a painful challenge for new mothers. Preventing it is crucial for comfort and health. Effective strategies can help manage this condition before it worsens. These methods focus on feeding routines and proper latch techniques.
How to Relieve Engorgement Fast
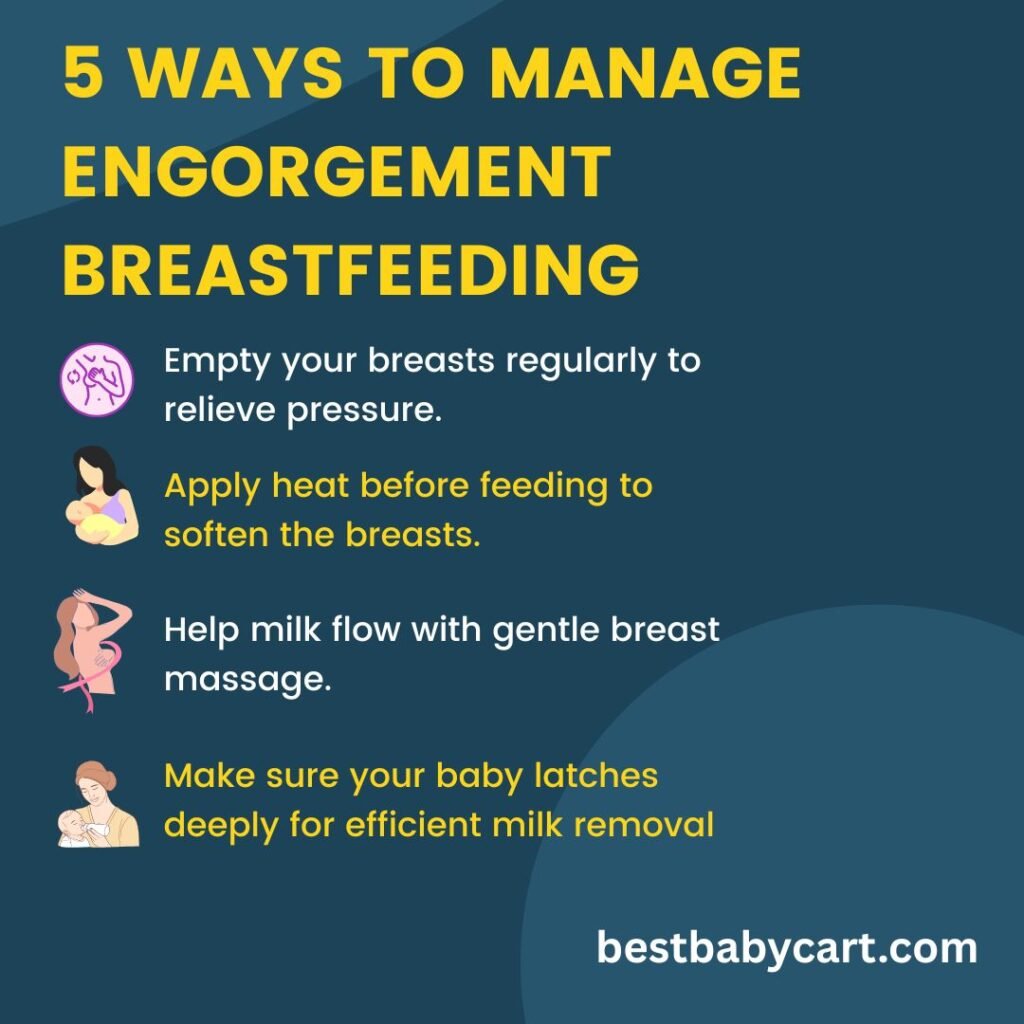
Engorgement hurts, but these expert-backed tips bring relief. Try these methods to feel better:
Nurse or Pump Frequently
How: Feed baby every 2–3 hours or pump with a Medela pump.
Why It Works: Removes milk, reducing pressure.
Tip: Wake baby for feeds if they sleep long, per HealthyChildren.org.
Why It Helps: Keeps milk flowing.
Use Warm Compresses Before Feeding
How: Apply a warm, wet cloth or Lansinoh hot/cold pack for 5–10 minutes.
Why It Works: Softens breasts, eases milk flow.
Caution: Avoid too much heat to prevent burns.
Why It Helps: Ensures safe relief.
Massage Breasts Gently
How: Use circular motions toward the nipple while nursing.
Why It Works: Clears blocked ducts, per La Leche League.
Tip: Massage during a warm shower for extra comfort.
Why It Helps: Combines heat and touch for relief.
Cold Compresses After Feeding
How: Use a cold Lansinoh pack or chilled cabbage leaves for 15 minutes.
Why It Works: Reduces swelling and pain.
Fun Fact: Cabbage leaves have natural anti-inflammatory properties!
Why It Helps: Offers a natural, soothing option.
Hand Express Milk
How: Gently press around the areola to release a little milk before feeding.
Why It Works: Softens nipples for better latching.
Tool: Use a Haakaa silicone pump for ease.
Why It Helps: Simplifies expression.
Take Pain Relievers
How: Use ibuprofen or acetaminophen, per your doctor.
Why It Works: Eases pain and inflammation.
Caution: Always check with your pediatrician first.
Why It Helps: Ensures safety for you and baby.
Checklist: Quick Engorgement Relief Tips
☐ Nurse or pump every 2–3 hours.
☐ Apply warm compress before feeding.
☐ Massage breasts gently.
☐ Use cold compress after feeding.
☐ Hand express to soften nipples.
image: How to Manage Engorgement Breastfeeding: Expert Tips
Long-term Management
Manage breastfeeding engorgement with gentle massage and frequent nursing. Warm compresses relieve swelling. Ensure proper latch for comfort and milk flow.
Managing engorgement while breastfeeding can be challenging. It’s essential to think about how to manage this issue long-term. This means not just dealing with the pain when it happens, but finding ways to prevent it from occurring frequently. What strategies can help you ensure a smoother breastfeeding journey for both you and your baby?
Regular Feeding Schedules
Creating a regular feeding schedule is crucial. Feeding your baby at consistent times helps regulate milk production. This prevents your breasts from becoming overly full, which can cause engorgement.
Think about what feeding schedule works best for you and your baby. You might want to feed every two to three hours during the day. Nighttime might require a different approach based on your baby’s sleep patterns.
Consistency is key. Keeping a journal of your baby’s feeding habits can help you spot patterns and adjust the schedule as needed.
Lifestyle Adjustments
Sometimes, lifestyle adjustments can make a big difference. Consider how your daily habits affect breastfeeding and engorgement.
Stress can impact milk supply and flow. Finding ways to relax and reduce stress can help. Maybe a short walk or a few minutes of meditation each day can make breastfeeding easier.
Diet also plays a role. Staying hydrated and eating well-balanced meals supports healthy milk production.
Think about your clothing choices too. Wearing loose, comfortable bras can reduce pressure on your breasts, minimizing engorgement discomfort.
Could small changes in your daily routine enhance your breastfeeding experience? Reflect on what adjustments might work for you and your family.
When To Seek Help
Experiencing intense pain or fever during breastfeeding signals the need to consult a healthcare professional. Persistent engorgement, redness, or swelling also requires medical attention. Seeking help ensures proper care and prevents complications.
Expert Tips to Manage Engorgement
If engorgement strikes, don’t panic! These expert-backed strategies can help relieve discomfort and get you back to enjoying your breastfeeding journey.
1. Breastfeed Often
Frequent nursing is the most effective way to relieve engorgement. Encourage your baby to feed as often as possible, starting with the fuller breast to promote milk flow.
2. Use Warm Compresses Before Feeding
Applying a warm compress or taking a warm shower before feeding can stimulate milk flow. The warmth helps soften the breast, making it easier for your baby to latch.
3. Try Cold Compresses After Feeding
After nursing or pumping, apply a cold pack (like a gel pack or a bag of frozen peas wrapped in a cloth) for 10–15 minutes to reduce swelling and soothe pain.
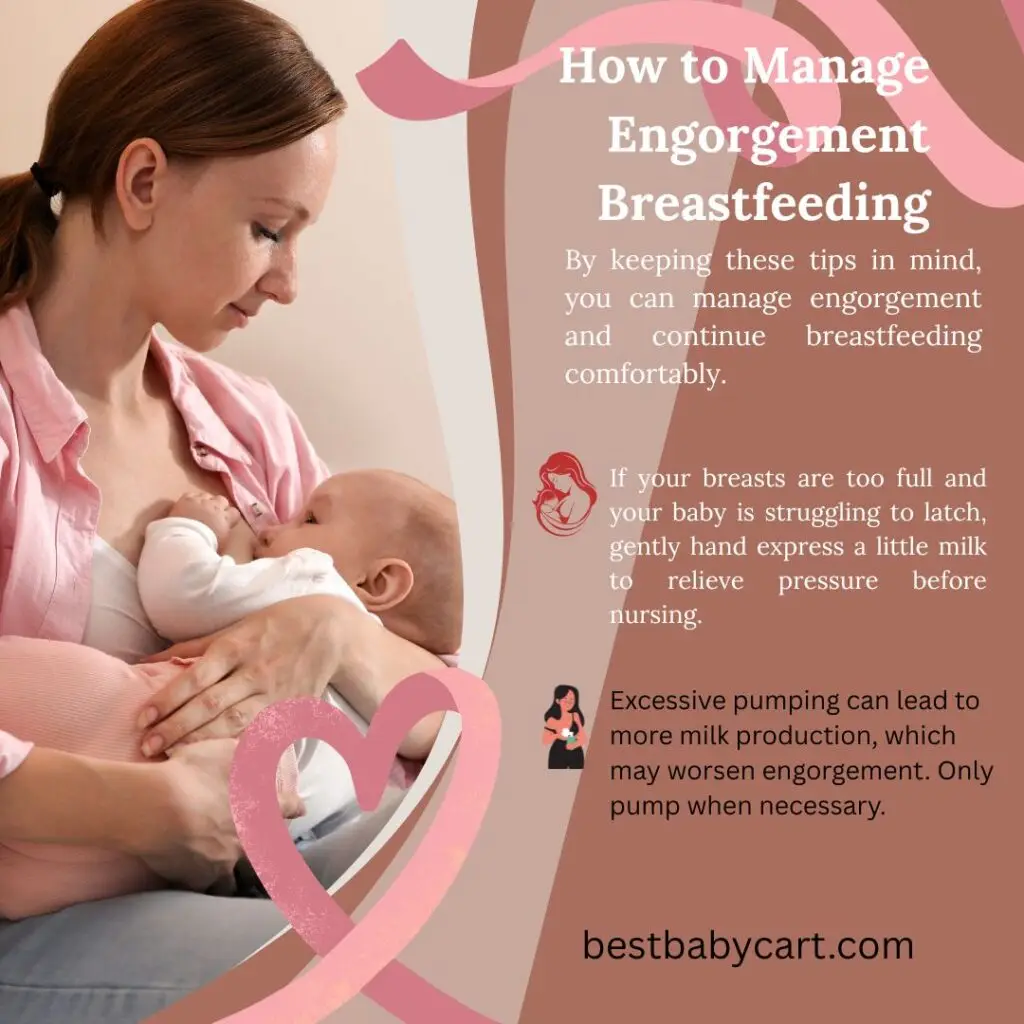
4. Hand-Express or Pump Strategically
If your baby can’t latch due to engorgement, hand-express or pump just enough milk to soften your breasts. Avoid over-pumping, as this can signal your body to produce more milk, worsening engorgement.
5. Massage Your Breasts
Gentle breast massage during feeding or pumping can help release milk and relieve blockages. Use circular motions, moving from the outer breast toward the nipple.
6. Use Reverse Pressure Softening
This technique involves gently pressing around the areola to push fluid back into the breast, softening the area so your baby can latch more easily.
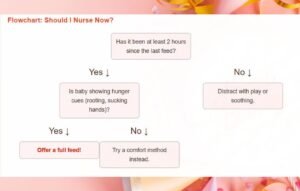
How to Manage Breast Engorgement Flowchart
plainShow inline
7. Take Pain Relief (If Needed)
If discomfort is intense, ask your doctor about over-the-counter pain relievers like ibuprofen, which can reduce pain and inflammation. Always check with a healthcare provider before taking medication while breastfeeding.
8. Stay Hydrated and Rested
Dehydration and exhaustion can make engorgement feel worse. Drink plenty of water and rest when you can (we know, easier said than done!).
Checklist: When to Call Your Doctor
☐ Fever or chills appear.
☐ Red, hot spots on breast.
☐ No relief after 48 hours.
☐ Baby struggles to latch.
Support Systems
Managing engorgement during breastfeeding involves expressing milk regularly to relieve pressure. Applying warm compresses before feeding can help ease milk flow. Cold packs after feeding may reduce swelling.
Breastfeeding can be a beautiful experience, but it often comes with challenges like engorgement. You don’t have to face this alone; support systems can make a big difference in managing engorgement effectively. Whether it’s leaning on your partner, family, or community resources, each offers unique advantages.
Partner And Family Involvement
Your partner can be your strongest ally during breastfeeding. Encourage them to learn about engorgement and its signs. When they understand what you’re going through, they can offer help without you needing to ask.
Family members can also play a crucial role. Imagine having someone to watch over the baby while you take a hot shower to relieve engorgement pain. Simple acts of kindness, like preparing meals or running errands, can be game-changers during this period. Engaging your loved ones in your breastfeeding journey can lighten your load significantly.
Community Resources
Local community resources can be invaluable. Check if there are breastfeeding support groups in your area. These groups often bring together mothers facing similar challenges, offering a space to share experiences and solutions. You might discover a tip that makes all the difference.
Healthcare professionals can also be part of your support network. Lactation consultants, for instance, can provide specialized advice tailored to your situation. Many hospitals offer breastfeeding clinics—take advantage of them.
Have you explored online communities? Platforms like forums and social media groups can connect you with mothers worldwide. They offer a wealth of shared experiences and advice that could be the key to managing your engorgement better.
How are you leveraging your support systems? The right support can transform your breastfeeding experience from overwhelming to empowering. Don’t hesitate to reach out and build a network that works for you.
Myths And Facts
Breast engorgement can be uncomfortable and challenging. It’s crucial to know both myths and facts for effective management. Proper techniques can relieve swelling and pain, allowing for smoother breastfeeding experiences.
Breastfeeding is a natural process, but it doesn’t always go as smoothly as we might expect. One common issue many new moms face is breast engorgement. It’s an uncomfortable experience, and there’s a lot of misinformation out there. Let’s sift through some myths and facts to help you manage engorgement effectively and keep your breastfeeding journey on track.
Common Misconceptions
Many believe that breast engorgement means you have an abundant milk supply. While it might seem logical, it’s not always true. Engorgement can occur when your body is still figuring out the right amount of milk to produce, leading to too much milk or even a blockage.
Another myth is that you should stop breastfeeding if your breasts are engorged. Some think it will give your body time to adjust. However, this can actually worsen the problem, as milk builds up and increases discomfort. Continuing to breastfeed or express milk is essential.
You might have heard that applying heat to engorged breasts is the best solution. While warmth can provide relief, it’s not always the most effective way to reduce swelling. Cold compresses might actually work better in some cases.
Evidence-based Practices
Research supports breastfeeding on demand as a way to manage engorgement. Feeding your baby whenever they show hunger cues helps regulate your milk supply. It also prevents milk from building up and causing discomfort.
Using a cold compress after feeding can help reduce swelling. Wrap a bag of frozen peas in a cloth and apply it to your breasts. It’s a simple yet effective way to ease the pain and reduce inflammation.
Gentle breast massage before and during feeding can aid in milk flow. Use light pressure and circular motions towards the nipple. This helps release any blocked milk and can make feedings more comfortable for both you and your baby.
Have you ever tried expressing a little milk before feeding? It can soften your breast, making it easier for your baby to latch. This small step can make a big difference in reducing engorgement.
Do you have any tips that have worked for you? Sharing your experiences can help other moms navigate this challenging time. Engorgement is temporary, and with the right approach, you can continue breastfeeding comfortably.
Frequently Asked Questions
Q: How Do You Get Rid Of Engorgement Fast?
A: Apply warm compresses and massage the breasts to improve milk flow. Nurse or pump frequently to relieve engorgement. Use cold packs to reduce swelling. Wear a supportive bra and avoid tight clothing. Consult a healthcare provider if discomfort persists.
Q: Should I Pump To Relieve Engorgement?
A: Yes, pumping can help relieve engorgement by removing excess milk. Use a breast pump or hand express gently. Avoid over-pumping to prevent increasing milk supply. Balance pumping with breastfeeding to maintain comfort and supply. Always consult a lactation expert for personalized advice.
Q: How Long Does Engorgement Last When Breastfeeding?
A: Breast engorgement typically lasts 24 to 48 hours. Frequent breastfeeding can help alleviate discomfort. If symptoms persist, consult a healthcare professional. Proper latching and regular feeding schedules can prevent engorgement issues. Stay hydrated and maintain a balanced diet to support breastfeeding.
Q: How Do You Unblock Engorgement?
A: Apply warm compresses and massage gently to relieve engorgement. Nurse frequently to empty the breasts. Use cold compresses after feeding to reduce swelling. Consider using a breast pump if necessary. Stay hydrated and wear a supportive bra for comfort. If persistent, consult a lactation consultant or healthcare professional.
Q: What causes breast engorgement? A: Engorgement happens when breasts overfill with milk, often in days 3–5 postpartum as milk transitions, or from missed feedings, per La Leche League. Blocked ducts or oversupply from pumping can also trigger it. Nurse every 2–3 hours to prevent buildup. If pain persists, try warm compresses or consult a lactation consultant to ensure proper milk flow.
Q: How long does engorgement last? A: Engorgement typically lasts 24–48 hours with proper management, like frequent nursing or pumping, per CDC. If it lasts longer, it may signal blocked ducts or latch issues. Use warm compresses before feeds and cold packs after to ease swelling. If no relief by 48 hours, call your doctor to check for complications like mastitis.
Q: Can I use cabbage leaves for engorgement relief? A: Yes, chilled cabbage leaves can reduce swelling and pain, thanks to their anti-inflammatory properties, per HealthyChildren.org. Place clean, cold leaves inside your bra for 15–20 minutes after feeding. Change when wilted. Don’t overuse, as they may reduce milk supply. Combine with nursing or pumping for best results.
Q: How can I prevent engorgement when breastfeeding? A: Prevent engorgement by nursing on demand (8–12 times daily), ensuring a good latch with a Boppy pillow, and pumping only for missed feeds, per American Academy of Pediatrics. Wear a supportive Kindred Bravely bra and wean gradually. These steps keep milk flowing and avoid buildup.
Q: Does engorgement affect my milk supply? A: Engorgement itself doesn’t reduce supply if managed quickly, per La Leche League. Frequent nursing or pumping prevents your body from slowing production. Untreated engorgement can lead to blocked ducts or mastitis, which may temporarily lower supply. Use a Medela pump to maintain flow and consult a lactation consultant if concerned.
Q: Can I take pain relievers for engorgement pain? A: Yes, ibuprofen or acetaminophen can ease engorgement pain, but check with your doctor first, per CDC. These are safe for breastfeeding when taken as directed. Combine with warm compresses and massage for faster relief. Always monitor for side effects and avoid overuse to keep you and baby safe.
Q: What should I do if my baby can’t latch due to engorgement? A: If engorgement flattens nipples, hand express or use a Haakaa pump to soften breasts before feeding, per HealthyChildren.org. Try different positions with a Boppy pillow. If latching remains hard, see a lactation consultant to improve technique. Keep nursing or pumping to prevent worsening engorgement.
Q: Can engorgement lead to mastitis? A: Yes, untreated engorgement can cause blocked ducts, which may lead to mastitis (breast infection), per CDC. Watch for fever, chills, or red spots. Nurse frequently, massage breasts, and use warm compresses to clear ducts. If symptoms appear, call your doctor for antibiotics or further care to avoid complications.
Q: How can I emotionally cope with engorgement stress? A: Engorgement can feel overwhelming, but rest, deep breathing, and asking for help ease stress, per HealthyChildren.org. Connect with baby through skin-to-skin time using a Boppy pillow to boost bonding. Join a breastfeeding support group or talk to friends. You’re not alone—small wins like a good feed build confidence!
Q: When should I see a doctor for engorgement? A: See a doctor if engorgement lasts over 48 hours, you have fever/chills, red hot spots, or baby can’t latch, per CDC. These may signal mastitis or blocked ducts. A lactation consultant can help with latch issues. Track symptoms in a Moleskine journal to share with your doctor. Early help keeps you nursing comfortably.
Conclusion
Managing engorgement during breastfeeding can be challenging but manageable. Remember to nurse frequently. This helps relieve discomfort and prevents complications. Applying warm compresses before feeding can help. Cold compresses after feeding reduce swelling. Gentle massage can ease pressure. Stay hydrated and maintain a balanced diet.
Seek support from healthcare professionals if needed. They offer valuable guidance and reassurance. Practice patience as your body adjusts. With time and care, breastfeeding becomes more comfortable. Prioritize your comfort and baby’s needs. Embrace this journey with confidence and knowledge.
Happy breastfeeding from BestBabyCart.com! Find more tips for your parenting journey.
Taslima Khanam Sultana, a loving mom of three, founded BestBabyCart.com to help new parents navigate the world of baby products with ease. Her passion for making parenting simpler shines through delivering honest, unbiased reviews on must-haves like diapers, strollers, and feeding gear. Taslima’s mission is to empower families with expert tips, ensuring every product is safe and top-quality for your little one. Drawing from her own parenting journey, she’s dedicated to supporting yours!
Want to help your baby shine? Try these simple ideas:
Fun Toys: Use Fisher-Price gyms or Manhattan Toy rattles.
Why It Helps: Sparks movement and thinking.
Music Time: Play songs or rhymes daily.
Why It Helps: Boosts language and joy.
Safe Space: Set up a Graco playard.
Why It Helps: Encourages safe exploration.
Track Growth
Use Apps: Try The Wonder Weeks for milestone updates.
Why It Helps: Keeps you informed.
Doctor Visits: Attend regular checkups.
Why It Helps: Ensures healthy growth.
Write It Down: Note milestones in a Moleskine journal.
Why It Helps: Tracks progress.
Stay Patient
Unique Paces: Some babies walk at 9 months, others at 15.
Why It Helps: Reduces worry.
No Comparing: Focus on your baby’s journey.
Why It Helps: Keeps parenting joyful.
Cheer Small Steps: Celebrate every milestone.
Why It Helps: Builds baby’s confidence.
You’re Amazing, Parents!
You’re rocking parenting! 😊 Your baby’s milestones are a celebration of love. With these expert tips, you’re set to support every step. Share your favourite milestone below—we’re cheering you on!
Q: When does my baby smile socially? A: Most babies smile socially by 6–12 weeks, per HealthyChildren.org. This “real” smile, often at your face or voice, shows they’re bonding. Encourage it by smiling, talking, or singing during playtime. If no smiles by 3 months, chat with your paediatrician to rule out vision or social delays. Every grin is a heart-melter, so keep those cuddles coming!
Q: Is it okay if my baby skips crawling? A: Yes, some babies skip crawling and move to standing or walking by 12–15 months. Crawling strengthens muscles, but scooting or rolling is fine too. Watch for other milestones, such as grabbing toys or sitting up by 9 months. If you’re worried, ask your doctor to check motor skills. Use a Graco playard to give them space to move safely.
Q: When do babies say their first words? A: Babies typically say “mama” or “dada” by 12 months, per American Academy of Pediatrics. They start with cooing (3 months), babbling (6 months), then words. Talk daily, name objects, and read Bright Starts books to boost language. If no words by 12 months, consult your doctor, as early speech therapy can help. Keep chatting—your voice is their favorite!
Q: How can I encourage my baby to walk? A: Help your baby walk by offering a Fisher-Price push toy or holding their hands for balance by 10–12 months. Create a safe space with a Graco playard to practice. Cheer their efforts to build confidence. Most walk by 12–15 months, but some take longer. If not standing by 12 months, talk to your paediatrician. Keep it fun—those first steps are magical!
Q: What should I do if I notice developmental delays? A: If your baby isn’t smiling by 3 months, rolling by 6 months, or saying words by 12 months, call your pediatrician, per CDC. Early signs like not tracking toys or babbling, need attention. Your doctor may suggest early intervention, like therapy, which helps 1 in 6 kids with delays. Track milestones in a Moleskine journal to share with your doctor. You’re doing great by staying alert!
Q: How can I track my baby’s milestones effectively? A: Track milestones with apps like The Wonder Weeks or a Moleskine journal to note smiles, crawls, or words. Regular check-ups at 1, 2, 4, 6, 9, and 12 months help monitor growth, per CDC. Take photos with a Nikon camera to capture moments. Compare to milestones like sitting by 8 months, but don’t stress—every baby’s unique. Journaling keeps memories alive!
Q: Why is tummy time so important for my baby? A: Tummy time strengthens neck and shoulder muscles, helping babies roll by 6 months and crawl by 9 months. Start with 3–5 minutes daily on a Fisher-Price mat, per HealthyChildren.org. It also prevents flat head spots. Make it fun with toys or mirrors. If your baby resists, try shorter sessions. This small step builds big milestones, so keep at it!
Q: How can I support my baby’s sensory development? A: Boost sensory skills by offering Bright Starts textured toys for touch and Manhattan Toy rattles for sound by 4–6 months. Sing songs to sharpen hearing and show colorful toys for vision. By 7–12 months, let them mouth safe objects to explore taste. If they don’t track toys by 3 months or respond to sounds, consult your doctor, per CDC. Sensory play is a joyful way to learn!
Q: Do cultural differences affect baby milestones? A: Yes, cultural practices can influence milestones, like talking or social behaviors, per American Academy of Pediatrics. For example, bilingual homes may delay first words slightly, but it’s normal. Some cultures emphasize early walking through play, while others focus on verbal bonding. Celebrate your baby’s unique pace and learn about your cultural norms. If concerned, like no babbling by 9 months, ask your pediatrician. Your baby’s journey is special!
Q: When does my baby develop memory skills? A: Babies show memory by recognizing routines at 6 months and finding hidden toys by 9–12 months, signaling object permanence. Play hide-and-seek with Manhattan Toy toys to boost memory. If they don’t recognize familiar faces by 3 months or routines by 6 months, talk to your doctor, per CDC. Memory grows through play, so keep those games going—your baby’s learning every day. Click here to know more..
Language and Social-Emotional Milestones
Your baby’s talking and feeling skills bloom. Here’s how:
Language Milestones
0–3 Months: Coos (“oo,” “ah”) by 3 months.
Why It Matters: Early speech practice.
4–6 Months: Babbles (“ba-ba”) by 6 months.
Why It Matters: Builds word foundations.
7–12 Months: Says “mama” or “dada” by 12 months.
Why It Matters: Starts real talking.
Social-Emotional Milestones
0–3 Months: Smiles socially by 6–12 weeks.
Why It Matters: Shows bonding.
4–6 Months: Laughs at play by 6 months.
Why It Matters: Expresses joy.
7–12 Months: Shows emotions (hugs, frustration) by 12 months.
Why It Matters: Builds emotional awareness.
Support Tips
Talk Daily: Name objects or describe actions.
Why It Helps: Boosts language.
Play Games: Try peek-a-boo or pat-a-cake.
Why It Helps: Encourages social skills.
Sensory Milestones: Senses Come Alive
Your baby’s senses grow fast, shaping learning. Here’s the progression:
0–3 Months: Tracks toys with eyes; turns to your voice.
Why It Matters: Builds vision and hearing.
4–6 Months: Touches textures like Manhattan Toy toys; loves music.
Why It Matters: Boosts touch and sound awareness.
7–12 Months: Mouths objects; mimics sounds like clapping.
Want to help your baby shine? Try these simple ideas:
Fun Toys: Use Fisher-Price gyms or Manhattan Toy rattles.
Why It Helps: Sparks movement and thinking.
Music Time: Play songs or rhymes daily.
Why It Helps: Boosts language and joy.
Safe Space: Set up a Graco playard.
Why It Helps: Encourages safe exploration.
Track Growth
Use Apps: Try The Wonder Weeks for milestone updates.
Why It Helps: Keeps you informed.
Doctor Visits: Attend regular checkups.
Why It Helps: Ensures healthy growth.
Write It Down: Note milestones in a Moleskine journal.
Why It Helps: Tracks progress.
Stay Patient
Unique Paces: Some babies walk at 9 months, others at 15.
Why It Helps: Reduces worry.
No Comparing: Focus on your baby’s journey.
Why It Helps: Keeps parenting joyful.
Cheer Small Steps: Celebrate every milestone.
Why It Helps: Builds baby’s confidence.
You’re Amazing, Parents!
You’re rocking parenting! 😊 Your baby’s milestones are a celebration of love. With these expert tips, you’re set to support every step. Share your favourite milestone below—we’re cheering you on!
Q: When does my baby smile socially? A: Most babies smile socially by 6–12 weeks, per HealthyChildren.org. This “real” smile, often at your face or voice, shows they’re bonding. Encourage it by smiling, talking, or singing during playtime. If no smiles by 3 months, chat with your paediatrician to rule out vision or social delays. Every grin is a heart-melter, so keep those cuddles coming!
Q: Is it okay if my baby skips crawling? A: Yes, some babies skip crawling and move to standing or walking by 12–15 months. Crawling strengthens muscles, but scooting or rolling is fine too. Watch for other milestones, such as grabbing toys or sitting up by 9 months. If you’re worried, ask your doctor to check motor skills. Use a Graco playard to give them space to move safely.
Q: When do babies say their first words? A: Babies typically say “mama” or “dada” by 12 months, per American Academy of Pediatrics. They start with cooing (3 months), babbling (6 months), then words. Talk daily, name objects, and read Bright Starts books to boost language. If no words by 12 months, consult your doctor, as early speech therapy can help. Keep chatting—your voice is their favorite!
Q: How can I encourage my baby to walk? A: Help your baby walk by offering a Fisher-Price push toy or holding their hands for balance by 10–12 months. Create a safe space with a Graco playard to practice. Cheer their efforts to build confidence. Most walk by 12–15 months, but some take longer. If not standing by 12 months, talk to your paediatrician. Keep it fun—those first steps are magical!
Q: What should I do if I notice developmental delays? A: If your baby isn’t smiling by 3 months, rolling by 6 months, or saying words by 12 months, call your pediatrician, per CDC. Early signs like not tracking toys or babbling, need attention. Your doctor may suggest early intervention, like therapy, which helps 1 in 6 kids with delays. Track milestones in a Moleskine journal to share with your doctor. You’re doing great by staying alert!
Q: How can I track my baby’s milestones effectively? A: Track milestones with apps like The Wonder Weeks or a Moleskine journal to note smiles, crawls, or words. Regular check-ups at 1, 2, 4, 6, 9, and 12 months help monitor growth, per CDC. Take photos with a Nikon camera to capture moments. Compare to milestones like sitting by 8 months, but don’t stress—every baby’s unique. Journaling keeps memories alive!
Q: Why is tummy time so important for my baby? A: Tummy time strengthens neck and shoulder muscles, helping babies roll by 6 months and crawl by 9 months. Start with 3–5 minutes daily on a Fisher-Price mat, per HealthyChildren.org. It also prevents flat head spots. Make it fun with toys or mirrors. If your baby resists, try shorter sessions. This small step builds big milestones, so keep at it!
Q: How can I support my baby’s sensory development? A: Boost sensory skills by offering Bright Starts textured toys for touch and Manhattan Toy rattles for sound by 4–6 months. Sing songs to sharpen hearing and show colorful toys for vision. By 7–12 months, let them mouth safe objects to explore taste. If they don’t track toys by 3 months or respond to sounds, consult your doctor, per CDC. Sensory play is a joyful way to learn!
Q: Do cultural differences affect baby milestones? A: Yes, cultural practices can influence milestones, like talking or social behaviors, per American Academy of Pediatrics. For example, bilingual homes may delay first words slightly, but it’s normal. Some cultures emphasize early walking through play, while others focus on verbal bonding. Celebrate your baby’s unique pace and learn about your cultural norms. If concerned, like no babbling by 9 months, ask your pediatrician. Your baby’s journey is special!
Q: When does my baby develop memory skills? A: Babies show memory by recognizing routines at 6 months and finding hidden toys by 9–12 months, signaling object permanence. Play hide-and-seek with Manhattan Toy toys to boost memory. If they don’t recognize familiar faces by 3 months or routines by 6 months, talk to your doctor, per CDC. Memory grows through play, so keep those games going—your baby’s learning every day. Click here to know more..
Wondering about your baby’s first-year milestones? 😊 This guide breaks down key steps—moving, thinking, talking, and bonding—from birth to 12 months. With simple tips, visuals, and expert advice, you’ll know how to support your baby’s growth!
Hey, parents! 😄 I’m a mom running BestBabyCart.com, and I still smile thinking of my baby’s first giggle and wobbly steps. The first year is full of exciting “firsts,” but it can spark questions like “When will my baby crawl?” or “Is my baby on track?” Don’t stress—this mom-to-mom guide makes first-year baby milestones easy to understand. With clear tips, fun visuals, and trusted advice, you’ll feel ready to cheer on every milestone. Let’s jump into this joyful journey!
🎉 0–3 Month Baby Milestones 🎉 Bright Beginnings: The Sweetest Firsts! (Designed with soft pastels, sunshine yellow accents, and smiley faces 🌞💫)
✅ Smiles for Days ☐ Starts flashing those adorable social smiles (around 6–8 weeks) ☐ Smiles in response to your voice or face 🥰
✅ Coo Coo for Cuddles ☐ Begins cooing or making vowel sounds like “ahh” or “ooh” ☐ Makes happy noises when talked to 🎶
✅ Look Who’s Looking! ☐ Follows moving objects with eyes (hello, ceiling fan friend!) ☐ Looks at faces—yep, you’re their favorite art piece 😍
✅ Tiny but Mighty Moves ☐ Holds head up for a few seconds during tummy time 💪 ☐ Brings hands to mouth (and maybe tries a nibble!)
✅ Little Listener ☐ Turns head toward sounds 🐶📣 ☐ Recognizes your voice (aww, instant calm)
✅ Touch + Feel Fun ☐ Opens and closes fists ☐ Begins batting at dangling toys (baby ninja training begins!)
Why First-Year Milestones Are Important
Milestones show how your baby grows in their first year. They help you track progress and spot any delays early. Here’s why they matter:
Physical Growth: Babies learn to roll, sit, and walk, building strength.
Brain Development: Babies start thinking, solving problems, and remembering.
Why It Matters: These skills lay the foundation for learning.
Social Skills: Smiling and babbling help babies connect with you.
Why It Matters: Bonding builds trust and love.
Emotional Health: Babies feel secure and show feelings like joy or frustration.
Why It Matters: Emotional growth helps babies feel safe.
About 1 in 6 kids may have delays, per CDC, so tracking milestones lets you act fast if needed. Plus, it’s a fun way to celebrate your baby’s unique path!
First-Year Milestones: A Month-by-Month Breakdown
Let’s explore the key milestones your baby may reach during their first year, broken down by age. This timeline is a general guide, and variations are common.
Image: chart of sensory milestones like tracking and mouthing
0–3 Months: Newborn Wonders
Your newborn is learning the world, with small but mighty milestones. Here’s what to expect:
Physical Milestones
Lifts Head: Raises head briefly during tummy time by 2–3 months.
Why It Matters: Strengthens neck muscles for future rolling.
Grasps Finger: Holds your finger tightly (reflex).
Why It Matters: Shows early muscle control.
Tracks Objects: Follows a toy with eyes by 3 months.
Why It Matters: Builds vision and focus skills.
Kicks Legs: Moves legs actively when lying down.
Why It Matters: Prepares for crawling and walking.
Cognitive & Social Milestones
Smiles: Gives first social smile by 6–12 weeks.
Why It Matters: Signals bonding and joy.
Coos: Makes soft sounds like “oo” or “ah.”
Why It Matters: Early step toward talking.
Knows Faces: Recognizes mom or dad by 3 months.
Why It Matters: Strengthens family bonds.
Support Tips
Tummy Time: 3–5 minutes daily on a Fisher-Price mat.
Why It Helps: Builds neck and shoulder strength.
Talk & Sing: Chat or sing to baby often.
Why It Helps: Sparks early language skills.
Cuddle: Hold baby close for skin-to-skin time.
Why It Helps: Fosters trust, per HealthyChildren.org.
Checklist: 0–3 Month Milestones
☐ Lifts head during tummy time.
☐ Smiles by 6–12 weeks.
☐ Coos or makes sounds.
☐ Tracks toys with eyes.
☐ Grasps finger tightly.
4–6 Months: Curious Explorers
Your baby’s getting active, with exciting new skills. Here’s what’s happening:
Physical Milestones
Rolls Over: Flips front to back, then back to front by 6 months.
Why It Matters: Builds core strength for sitting.
Sits with Help: Leans on hands or a Boppy pillow.
Why It Matters: Prepares for sitting alone.
Grabs Toys: Reaches for Manhattan Toy rattles.
Why It Matters: Improves hand-eye coordination.
Pushes Up: Lifts chest during tummy time.
Why It Matters: Strengthens arms for crawling.
Cognitive & Social Milestones
Babbles: Makes sounds like “ba-ba” or “ga-ga.”
Why It Matters: Early practice for words.
Laughs: Giggles at silly faces or peek-a-boo.
Why It Matters: Shows joy and social connection.
Knows Name: Turns head when called by 6 months.
Why It Matters: Signals memory growth.
Explores Cause & Effect: Shakes a rattle to hear noise.
Why It Matters: Builds problem-solving skills.
Support Tips
Play with Toys: Offer Manhattan Toy sensory toys.
Why It Helps: Encourages grabbing and exploration.
Read Books: Use Bright Starts cloth books.
Why It Helps: Boosts language and focus.
Mirror Time: Show baby their reflection.
Why It Helps: Sparks self-awareness.
Image: Baby Miletsone, what to expect in the first year!
7–9 Months: Little Adventurers
Your baby’s on the move, with growing independence. Here’s what to watch for:
Physical Milestones
Sits Alone: Balances without support by 8 months.
Why It Matters: Frees hands for play.
Crawls: Scoots or crawls by 9 months (some skip it).
Why It Matters: Boosts mobility and exploration.
Pulls to Stand: Holds onto a Graco playard.
Why It Matters: Prepares for walking.
Pincer Grasp: Picks up small items with thumb and finger.
Why It Matters: Helps with self-feeding.
Cognitive & Social Milestones
Understands “No”: Pauses when you say it.
Why It Matters: Shows early rule-learning.
Plays Games: Loves pat-a-cake or peek-a-boo.
Why It Matters: Builds social skills.
Imitates Sounds: Copies “mama” or “dada.”
Why It Matters: Steps toward talking.
Shows Favorites: Reaches for loved toys or people.
Why It Matters: Signals emotional bonds.
Support Tips
Safe Play Area: Use a Graco playard.
Why It Helps: Lets baby explore safely.
Sing Songs: Try nursery rhymes, per American Academy of Pediatrics.
Why It Helps: Encourages language.
Offer Snacks: Give Gerber puffs for pincer practice.
Why It Helps: Supports fine motor skills.
10–12 Months: Toddler Time Begins
Your baby’s almost a toddler, with big leaps in skills. Here’s what’s coming:
Physical Milestones
Stands Alone: Balances briefly by 12 months.
Why It Matters: Prepares for walking.
First Steps: Walks with help or alone (some wait until 15 months).
Why It Matters: Marks major mobility.
Fine Motor Skills: Stacks blocks or turns Bright Starts book pages.
Why It Matters: Boosts hand control.
Points: Uses finger to show interest.
Why It Matters: Early communication tool.
Cognitive & Social Milestones
Says First Words: “Mama,” “dada,” or simple words by 12 months.
Why It Matters: Starts real talking.
Follows Directions: Waves “bye-bye” when asked.
Why It Matters: Shows understanding.
Shows Emotions: Gives hugs or shows frustration.
Why It Matters: Builds emotional awareness.
Plays Socially: Enjoys games with others.
Why It Matters: Strengthens bonds.
Support Tips
Walking Toys: Use a Fisher-Price push toy.
Why It Helps: Encourages steps.
Talk Daily: Name objects to grow vocabulary.
Why It Helps: Boosts word learning.
Cheer Them On: Clap for new skills.
Why It Helps: Builds confidence.
Bonding Through Milestones
Milestones are perfect for connecting with your baby. Here’s how to make them special:
Build Trust: Respond to cries quickly.
Why It Helps: Makes baby feel secure.
Play Together: Try peek-a-boo or stack Manhattan Toy blocks.
Why It Helps: Strengthens your bond.
Celebrate Wins: Cheer for smiles or steps.
Why It Helps: Boosts baby’s confidence.
Handle Separation Anxiety
What It Is: Clinging or crying when you leave (common at 6–12 months).
Why It Happens: Baby loves you and fears you’re gone!
How to Help: Practice short goodbyes, use a Boppy for comfort.
Why It Works: Eases baby’s worry.
Make Memories
Take Photos: Use a Nikon camera for milestone shots.
Why It Helps: Captures precious moments.
Keep a Journal: Write milestones in a Moleskine notebook.
Why It Helps: Creates a keepsake.
Family Fun: Include siblings or grandparents in play.
Why It Helps: Builds family love.
Image: family smiling and playing with baby on a mat
Red Flags: When to Check In
Most babies grow at their own pace, but some delays need a doctor’s look. Call your pediatrician if:
0–3 Months: No smiling or eye-tracking by 3 months.
Why It Matters: Could signal vision or social delays.
4–6 Months: No rolling or grabbing by 6 months.
Why It Matters: May indicate motor issues.
7–9 Months: No babbling or sitting by 9 months.
Why It Matters: Could affect language or strength.
10–12 Months: No words or pointing by 12 months.
Why It Matters: May signal communication delays.
What to Do: Your doctor may suggest early intervention, per CDC. Acting early helps your baby thrive!
Checklist: Red Flags to Watch
☐ No smiling by 3 months.
☐ No rolling by 6 months.
☐ No babbling by 9 months.
☐ No words by 12 months.
☐ Talk to paediatrician if concerned.
Image: First-year Baby Milestone
Exploration, Memory, and Problem-solving
Your baby’s brain is buzzing with curiosity and learning. Here’s what develops:
Exploration and Curiosity: Reaches for toys by 4–6 months; explores objects by 7–9 months.
Why It Matters: Drives discovery and learning.
Memory Development: Recognizes routines by 6 months; finds hidden toys by 9–12 months.
Want to help your baby shine? Try these simple ideas:
Fun Toys: Use Fisher-Price gyms or Manhattan Toy rattles.
Why It Helps: Sparks movement and thinking.
Music Time: Play songs or rhymes daily.
Why It Helps: Boosts language and joy.
Safe Space: Set up a Graco playard.
Why It Helps: Encourages safe exploration.
Track Growth
Use Apps: Try The Wonder Weeks for milestone updates.
Why It Helps: Keeps you informed.
Doctor Visits: Attend regular checkups.
Why It Helps: Ensures healthy growth.
Write It Down: Note milestones in a Moleskine journal.
Why It Helps: Tracks progress.
Stay Patient
Unique Paces: Some babies walk at 9 months, others at 15.
Why It Helps: Reduces worry.
No Comparing: Focus on your baby’s journey.
Why It Helps: Keeps parenting joyful.
Cheer Small Steps: Celebrate every milestone.
Why It Helps: Builds baby’s confidence.
You’re Amazing, Parents!
You’re rocking parenting! 😊 Your baby’s milestones are a celebration of love. With these expert tips, you’re set to support every step. Share your favourite milestone below—we’re cheering you on!
Q: When does my baby smile socially? A: Most babies smile socially by 6–12 weeks, per HealthyChildren.org. This “real” smile, often at your face or voice, shows they’re bonding. Encourage it by smiling, talking, or singing during playtime. If no smiles by 3 months, chat with your paediatrician to rule out vision or social delays. Every grin is a heart-melter, so keep those cuddles coming!
Q: Is it okay if my baby skips crawling? A: Yes, some babies skip crawling and move to standing or walking by 12–15 months. Crawling strengthens muscles, but scooting or rolling is fine too. Watch for other milestones, such as grabbing toys or sitting up by 9 months. If you’re worried, ask your doctor to check motor skills. Use a Graco playard to give them space to move safely.
Q: When do babies say their first words? A: Babies typically say “mama” or “dada” by 12 months, per American Academy of Pediatrics. They start with cooing (3 months), babbling (6 months), then words. Talk daily, name objects, and read Bright Starts books to boost language. If no words by 12 months, consult your doctor, as early speech therapy can help. Keep chatting—your voice is their favorite!
Q: How can I encourage my baby to walk? A: Help your baby walk by offering a Fisher-Price push toy or holding their hands for balance by 10–12 months. Create a safe space with a Graco playard to practice. Cheer their efforts to build confidence. Most walk by 12–15 months, but some take longer. If not standing by 12 months, talk to your paediatrician. Keep it fun—those first steps are magical!
Q: What should I do if I notice developmental delays? A: If your baby isn’t smiling by 3 months, rolling by 6 months, or saying words by 12 months, call your pediatrician, per CDC. Early signs like not tracking toys or babbling, need attention. Your doctor may suggest early intervention, like therapy, which helps 1 in 6 kids with delays. Track milestones in a Moleskine journal to share with your doctor. You’re doing great by staying alert!
Q: How can I track my baby’s milestones effectively? A: Track milestones with apps like The Wonder Weeks or a Moleskine journal to note smiles, crawls, or words. Regular check-ups at 1, 2, 4, 6, 9, and 12 months help monitor growth, per CDC. Take photos with a Nikon camera to capture moments. Compare to milestones like sitting by 8 months, but don’t stress—every baby’s unique. Journaling keeps memories alive!
Q: Why is tummy time so important for my baby? A: Tummy time strengthens neck and shoulder muscles, helping babies roll by 6 months and crawl by 9 months. Start with 3–5 minutes daily on a Fisher-Price mat, per HealthyChildren.org. It also prevents flat head spots. Make it fun with toys or mirrors. If your baby resists, try shorter sessions. This small step builds big milestones, so keep at it!
Q: How can I support my baby’s sensory development? A: Boost sensory skills by offering Bright Starts textured toys for touch and Manhattan Toy rattles for sound by 4–6 months. Sing songs to sharpen hearing and show colorful toys for vision. By 7–12 months, let them mouth safe objects to explore taste. If they don’t track toys by 3 months or respond to sounds, consult your doctor, per CDC. Sensory play is a joyful way to learn!
Q: Do cultural differences affect baby milestones? A: Yes, cultural practices can influence milestones, like talking or social behaviors, per American Academy of Pediatrics. For example, bilingual homes may delay first words slightly, but it’s normal. Some cultures emphasize early walking through play, while others focus on verbal bonding. Celebrate your baby’s unique pace and learn about your cultural norms. If concerned, like no babbling by 9 months, ask your pediatrician. Your baby’s journey is special!
Q: When does my baby develop memory skills? A: Babies show memory by recognizing routines at 6 months and finding hidden toys by 9–12 months, signaling object permanence. Play hide-and-seek with Manhattan Toy toys to boost memory. If they don’t recognize familiar faces by 3 months or routines by 6 months, talk to your doctor, per CDC. Memory grows through play, so keep those games going—your baby’s learning every day. Click here to know more..
Taslima Khanam Sultana, a loving mom of three, founded BestBabyCart.com to help new parents navigate the world of baby products with ease. Her passion for making parenting simpler shines through delivering honest, unbiased reviews on must-haves like diapers, strollers, and feeding gear. Taslima’s mission is to empower families with expert tips, ensuring every product is safe and top-quality for your little one. Drawing from her own parenting journey, she’s dedicated to supporting yours!
A baby nap schedule guide can feel daunting. Babies have unique sleep needs that change as they grow.
Welcome, tired parents! If you’ve ever felt like nap time is a battleground, you’re not alone. A fussy, overtired baby can turn your day upside down, leaving you wondering how to bring back the peace. The good news? A well-crafted baby nap schedule can be your secret weapon for better sleep, for both your little one and you. As a parent, you deserve rest too, and with the right guidance, you can create a baby sleep routine that works wonders.
In this comprehensive guide, we’ll walk you through age-specific nap schedules, expert tips to establish a routine, and creative ideas to make nap time a breeze. Whether your baby is a newborn or a toddler, we’ve got you covered with proven strategies backed by sleep experts. Let’s dive in and transform those restless days into peaceful naps!
Why Is a Nap Schedule Important for Babies?
Naps aren’t just a luxury—they’re a necessity for your baby’s growth and your sanity. Here’s why a nap schedule should be at the top of your parenting toolkit:
Brain and Body Boost: Sleep supports cognitive development, memory, and physical growth. The American Academy of Pediatrics highlights that naps enhance learning and emotional regulation in babies.
Mood Magic: A well-rested baby is less cranky, making playtime and bonding more enjoyable for everyone.
Nighttime Harmony: Consistent naps prevent overtiredness, which can lead to nighttime waking or shorter sleep cycles.
Parent Perk: Predictable nap times give you a chance to recharge, work, or simply enjoy a quiet cup of coffee.
Without a schedule, your baby might miss these benefits, leading to a cycle of exhaustion. Let’s explore how to tailor a nap plan to your baby’s age.
Age-Specific Baby Nap Schedule Guidelines
Every baby is unique, but general guidelines can help you build a foundation. Here’s a detailed breakdown by age, based on expert recommendations:
Newborns nap tips (0-3 Months)
Nap Frequency: 4-5 naps per day
Nap Duration: 30 minutes to 2 hours
Total Nap Time: 4-6 hours
Wake Windows: 45-60 minutes
Insight: Newborns sleep 14-17 hours total, including naps, but their patterns are erratic. Watch for sleepy cues like yawning or glazed eyes to guide nap times.
Infants (4-6 Months)
Nap Frequency: 3-4 naps per day
Nap Duration: 1-2 hours
Total Nap Time: 3-4 hours
Wake Windows: 1.5-2 hours
Insight: As your baby’s circadian rhythm develops, aim for naps around 9 AM, 12 PM, and 3 PM. Flexibility is key as they adjust.
Older Infants (7-12 Months)
Nap Frequency: 2-3 naps per day
Nap Duration: 1-2 hours
Total Nap Time: 2-3 hours
Wake Windows: 2-3 hours
Insight: Most babies drop to 2 naps by 9 months. Schedule a morning nap (9-10 AM) and an afternoon nap (1-2 PM) to align with their energy dips.
Toddlers (1-2 Years)
Nap Frequency: 1-2 naps per day
Nap Duration: 1-3 hours
Total Nap Time: 1-3 hours
Wake Windows: 4-5 hours
Insight: By 15-18 months, most toddlers’ nap schedules settle into 1 nap around 12-1 PM. Ensure it doesn’t push bedtime too late (aim for 7-8 PM).
Image: Follow this age-specific guide to create the perfect nap schedule for your baby!
Expert Tips for Creating a Better Baby Nap Schedule
Building a nap schedule takes patience, but these expert tips will guide you every step of the way. Let’s make naptime a success!
Watch for Sleepy Cues
Timing naps around your baby’s natural sleepiness is crucial. Missing the window can lead to overtiredness, making naps harder to achieve.
How to Spot Cues: Look for yawning, eye-rubbing, fussiness, or staring off into space.
Action Plan: Track wake windows for a few days (e.g., 45 minutes for newborns) and start the nap routine when cues appear.
Emotional Note: It’s okay if you miss a cue sometimes—parenting is a learning curve, and you’re doing great!
Image: Yawning is a key sleepy cue—time for a nap!
Create a Calming Pre-Nap Routine
A predictable routine signals to your baby that sleep is near, reducing resistance and building trust.
Routine Ideas: Dim the lights, sing a lullaby, read a short book, or offer a gentle cuddle.
Duration: Keep it 5-10 minutes to maintain consistency without overstaying.
Expert Backing: The Sleep Foundation notes routines help babies associate actions with sleep.
As your baby grows, they’ll need fewer naps. Handle transitions with care.
Signs to Watch: Nap resistance or shorter naps signal a transition (e.g., 3 to 2 naps at 6-9 months).
Strategy: Shift remaining naps earlier and adjust bedtime. Offer “quiet time” with books if needed.
The “Nap Time Kit”
Take naps on the go with a “Nap Time Kit”—a portable solution for consistent sleep anywhere. Include a white noise machine, a favorite blanket, a pacifier (if used), and a mini book. Pack it in a cute bag for travel or daycare. This kit ensures your baby’s routine stays intact, giving you peace of mind.
Nap Schedule for Babies Checklist
Ensure nap success with this practical checklist:
[xyz-ihs snippet=”baby-nap-schedule-checklist”]
Impact On Growth
Sleep plays a vital role in physical growth. During naps, the body releases growth hormones. This process supports healthy weight and height gain. Quality sleep also strengthens the immune system. A well-rested baby can fight off illnesses more effectively. Nap time supports both physical and mental growth.
Image: Sleep Training
Newborn Sleep Cycles
Newborns sleep a lot. Usually, they rest for 14 to 17 hours a day. Their sleep cycle is shorter, around 50 to 60 minutes. During this time, they move between active and quiet sleep. Active sleep involves rapid eye movements and light sleep. Quiet sleep is deep and restful. Newborns need frequent naps due to their short sleep cycles.
Changes Over Time
As babies grow, their sleep patterns change. By three months, they start developing longer sleep cycles. They may sleep for 60 to 90 minutes at a stretch. These changes help in establishing a more predictable nap schedule. By six months, many babies sleep for 6 to 8 hours at night. Naps become more structured, usually two or three times a day. Understanding these changes helps you adapt your nap schedule effectively.
FAQs About Baby Nap Schedules
How do I know if my baby is ready to drop a nap? Look for nap resistance, shorter naps, or difficulty falling asleep at bedtime. Most babies drop from 3 to 2 naps at 6–9 months and from 2 to 1 nap at 15–18 months.
What if my baby won’t nap at the scheduled time? Shorten the wake window or adjust the schedule by 15–30 minutes. Ensure a calming environment and routine to help them settle.
Can I let my baby nap in a stroller or car seat? Occasionally, yes, but avoid regular use. The AAP recommends a flat, firm surface like a crib for safety during longer naps.
How long should a baby nap at 6 months? At 6 months, expect 3–4 naps totaling 3–4 hours, with each nap lasting 1-2 hours. Adjust based on their nighttime sleep.
What if my baby wakes up early from a nap? If they wake after less than 45 minutes, soothe them back to sleep with rocking. If it’s consistent, they may need a longer wake window.
want to know more about new parenting pls click our FAQ’s
Conclusion: Better Sleep Starts with a Nap Schedule
Creating a baby nap schedule is a journey of love and patience, and it’s one of the best gifts you can give your child—and yourself. With these expert tips, from watching sleepy cues to building a Nap Time Kit, you’ll unlock the secret to better sleep for your little one. Every nap is a step toward a happier, healthier baby, and you’re doing an amazing job navigating this process.
Ready to explore more parenting wisdom? Dive into our Baby Care section for additional tips and product recommendations.
Taslima Khanam Sultana, a loving mom of three, founded BestBabyCart.com to help new parents navigate the world of baby products with ease. Her passion for making parenting simpler shines through delivering honest, unbiased reviews on must-haves like diapers, strollers, and feeding gear. Taslima’s mission is to empower families with expert tips, ensuring every product is safe and top-quality for your little one. Drawing from her own parenting journey, she’s dedicated to supporting yours!
Serving banana bread to your baby is simple. It’s a healthy and delicious treat.
Banana bread can be a wonderful snack for babies. It’s soft, moist, and easy to chew. Packed with nutrients, it supports your baby’s growth. But how do you serve it safely? Babies have different needs from adults. You must ensure the bread is baby-friendly.
This means focusing on texture and ingredients. Avoid adding nuts or large chunks. Stick with basic, natural ingredients. This way, your baby can enjoy a tasty and nutritious treat without risk. This guide will explore the best ways to serve banana bread to your baby. Get ready to make snack time fun and safe for your little one!
Introduction To Banana Bread For Babies
Introduce banana bread to babies by serving small, soft pieces. Ensure it is moist and easy to chew. This treat provides a nutritious snack option.
Banana bread is a delightful treat. Babies love its sweet taste and soft texture. It is also easy to make at home. Introducing banana bread to your baby can be a fun and nutritious experience. Here, we will explore why banana bread is a great choice for babies and its nutritional benefits.
Why Choose Banana Bread?
Banana bread is a great choice for babies for several reasons:
Soft Texture: Easy for babies to chew and swallow.
Natural Sweetness: Contains natural sugars from bananas.
Versatile: Can be made with various healthy ingredients.
Homemade: Allows control over the ingredients.
This makes banana bread an ideal snack or breakfast option for your little one.
Nutritional Benefits
Banana bread offers many nutritional benefits that support your baby’s growth and development:
Nutrient
Benefit
Bananas
Rich in potassium, it supports heart health.
Whole Wheat Flour
High in fiber, aids digestion.
Eggs
Great source of protein, supporting muscle growth.
Milk
Provides calcium, strengthens bones.
Banana bread can also be customized. You can add other nutritious ingredients like oats or nuts (if your baby is old enough). This enhances its nutritional profile even more. In summary, banana bread is not just tasty. It is also packed with essential nutrients your baby needs. “`
Ingredients For Baby-friendly Banana Bread
Serve baby-friendly banana bread by using mashed ripe bananas, whole wheat flour, and no added sugar. Cut into small, soft pieces to avoid choking hazards.
Making banana bread for your baby can be both fun and rewarding. It’s a great way to introduce new flavors and textures. Plus, it’s packed with nutrients. Choosing the right ingredients is key. They should be safe, healthy, and easy to digest.
Essential Ingredients
To make baby-friendly banana bread, start with ripe bananas. They add natural sweetness and are easy to mash. Use whole wheat flour for added fiber. Eggs help bind the ingredients together. You can replace eggs with applesauce if needed. Next, include unsweetened applesauce or yogurt. These keep the bread moist without added sugar. Use baking powder to help the bread rise. A pinch of cinnamon adds a touch of flavor.
Optional Add-ins
For extra nutrition, consider adding mashed sweet potatoes. They blend well and are rich in vitamins. Chia seeds or ground flaxseeds can add healthy fats. Just a small amount will do. You can also mix in finely chopped fruits. Soft fruits like apples or pears work best. Avoid nuts and seeds that are hard for babies to chew. Finally, a little vanilla extract can enhance the flavor. Just a drop or two is enough. Always ensure optional add-ins are suitable for your baby’s age and dietary needs. “`
Preparation Tips
Preparing banana bread for your baby can be a rewarding task. It’s a nutritious snack that you can make easily at home. Follow these simple preparation tips to ensure your baby enjoys a delicious and safe treat.
Selecting The Right Bananas
Choose ripe bananas with brown spots. They are sweeter and easier to mash. Avoid using overripe bananas with a strong smell. These might upset your baby’s stomach. Organic bananas are a great choice. They are free from harmful pesticides.
Mixing And Baking
Mash the bananas until smooth. Add other ingredients like flour and eggs. Ensure you mix them well to avoid lumps. Preheat your oven to 350°F (175°C). Use a non-stick baking pan. This prevents sticking and makes cleanup easier.
Pour the mixture into the pan. Bake for 45-50 minutes. Insert a toothpick into the center. It should come out clean if the bread is ready. Let the bread cool before serving it to your baby.
Serving Methods
Introducing banana bread to your baby can be a delightful experience. Babies usually love the sweet taste and soft texture. There are several serving methods to consider. These methods ensure your baby enjoys their meal safely and happily.
Finger Foods
Finger foods are a great way to help your baby develop motor skills. Banana bread is soft and easy to hold.
Cut the banana bread into small, manageable pieces.
Ensure each piece is bite-sized to avoid choking.
Serve the pieces on a plate or in a bowl your baby can reach.
Finger foods encourage self-feeding. It also helps in developing coordination. Always supervise your baby while they eat. A well-rested baby enjoys meals more—check our baby sleep solutions for better naps.
Pureed Options
For younger babies, pureeing banana bread might be the best choice. It ensures they can swallow easily.
Take a slice of banana bread.
Cut it into smaller chunks.
Place the chunks in a blender.
Add a small amount of breast milk, formula, or water.
Blend until you reach a smooth consistency.
Pureed options are perfect for babies who are just starting solids. They provide a smooth and easy-to-swallow texture.
By offering these serving methods, you can make banana bread a fun and safe option for your baby. Always monitor your baby during meals to ensure they enjoy their food safely.
Allergen Considerations
Introducing banana bread to your baby can be exciting. Yet, it’s important to consider potential allergens. This section will guide you through common allergens and provide substitutes to ensure your baby enjoys banana bread safely.
Common Allergens
Banana bread often includes ingredients that might trigger allergies. Here are some common allergens to watch out for:
Eggs – A common ingredient in many baked goods.
Dairy – Such as milk or butter.
Nuts – Sometimes added for extra flavor or texture.
Gluten – Found in regular flour used in baking.
Substitutes For Allergens
There are many substitutes you can use to make banana bread safe for your baby. Here’s how you can replace common allergens:
Allergen
Substitute
Eggs
Use mashed bananas or unsweetened applesauce. 1/4 cup per egg.
Dairy
Replace milk with almond or coconut milk. Use dairy-free margarine instead of butter.
Nuts
Omit nuts from the recipe. Use seeds like flax or chia for texture.
Gluten
Use gluten-free flour blends. Ensure it’s labeled safe for those with celiac disease.
By using these substitutes, you can create a delicious and safe banana bread for your baby. Always check labels and consult with a pediatrician if you’re unsure about any ingredient.
Storing Banana Bread
Storing banana bread properly ensures it stays fresh and delicious for your baby. You can keep it in the refrigerator or freeze it to extend its shelf life. Both methods are easy and help maintain the bread’s texture and flavor.
Refrigeration Tips
Refrigerate banana bread to keep it fresh for up to a week. First, let the bread cool completely. Then, wrap it tightly in plastic wrap or aluminum foil. This prevents it from drying out. Place the wrapped bread in an airtight container or a resealable plastic bag. Store it on a shelf, not in the crisper drawer. This helps maintain the right humidity level.
Freezing Techniques
Freezing banana bread is a great way to keep it fresh for up to three months. Let the bread cool completely before freezing. Slice the bread into baby-friendly portions. This makes it easier to thaw only what you need. Wrap each slice in plastic wrap or aluminum foil. Place the wrapped slices in a freezer-safe bag or container. Label the container with the date for easy tracking. When ready to serve, thaw a slice in the refrigerator or at room temperature.
Creative Serving Ideas
Serving banana bread to your baby can be both fun and nutritious. With creative serving ideas, you can make each meal exciting. These ideas are simple, easy to prepare, and sure to delight your little one.
Fruit Pairings
Pair banana bread with fresh fruits. Sliced strawberries or blueberries work well. These fruits add a burst of color and flavor. You can mash some fruits and spread them on the bread.
Another great option is to serve the bread with apple slices. The crunchiness of the apples complements the softness of the bread. For a tropical twist, try adding small pieces of mango. Your baby will love the sweetness.
Healthy Toppings
Top the banana bread with natural yogurt. This adds a creamy texture and boosts protein. You can also sprinkle a pinch of cinnamon on top. Cinnamon enhances the flavor and adds a warm aroma.
Another healthy topping is nut butter. Spread a thin layer of almond or peanut butter on the bread. This adds healthy fats and makes the meal more filling. For a bit of crunch, sprinkle some chia seeds. They are tiny but packed with nutrients.
Safety Tips
Serve banana bread to your baby in small, soft pieces. Make sure it’s cool to avoid burns. Always supervise them while eating.
Serving banana bread to your baby can be a delightful treat. Yet, it’s important to ensure their safety. Here are some essential safety tips to keep in mind.
Choking Hazards
Babies have smaller airways, making choking a real risk. Always cut the banana bread into small, manageable pieces. Ensure they are soft and easy to chew. Avoid adding nuts or large chunks of fruit. These can pose choking hazards. Watch your baby closely while they eat. Never leave them unattended.
Portion Sizes
Portion control is key for babies. Start with small portions of banana bread. A small piece, about the size of your baby’s palm, is ideal. You can always offer more if needed. Overfeeding can lead to stomach discomfort. Remember, banana bread is a treat, not a meal replacement. Stick to appropriate portion sizes. “`
https://www.youtube.com/watch?v=VKIKIBNOInQ
Frequently Asked Questions
Here are the answers to the questions I often hear from new parents like you—let’s make feeding your baby fun and nutritious together!
When Can My Baby Start Eating Banana Bread?
Most babies can start eating banana bread around 6-9 months, once they’ve mastered purees and can handle soft, mashed textures. As a mom of three, I waited until my babies showed signs of readiness—like sitting up with support and grasping food. Check our baby milestones guide to ensure your little one is developmentally ready for solids!
Is Banana Bread Safe for Babies?
Yes, banana bread can be safe if made without added sugar, salt, or allergens like nuts. Use ripe bananas for natural sweetness and whole-grain flour for nutrition. Always mash or cut into small, soft pieces to avoid choking—my kids loved it this way! Consult the AAP guide on starting solids for more safety tips.
How Do I Prepare Banana Bread for My Baby?
Start with a simple recipe: mash ripe bananas, mix with whole-grain flour, a bit of breast milk or formula, and bake at a low temperature. Let it cool, then mash or break into tiny pieces. I used to make mini muffins for my babies—easy to serve and mess-free! A baby food maker on Amazon can simplify prep if you’re short on time.
Can Banana Bread Help with Baby Nutrition?
Absolutely! Bananas are rich in potassium and vitamin B6, supporting your baby’s growth. Whole-grain flour adds fiber, making it a nutritious option for little tummies. I noticed my kids had more energy on days we included it—pair it with our baby’s first foods guide for a balanced diet!
What If My Baby Doesn’t Like Banana Bread?
Every baby is different—mine had mixed reactions! Try different textures (e.g., mashed vs. pieces) or mix with a familiar puree like applesauce. If they still refuse, don’t worry—offer it again later. The CDC baby nutrition guidelines suggest introducing new foods multiple times. Got more feeding questions? Check our FAQ for new parents!
How Often Can I Serve Banana Bread to My Baby?
Offer banana bread 1-2 times a week as a treat, not a daily staple. Balance it with a variety of fruits, veggies, and proteins. I kept it special for my kids, like a weekend snack—perfect with our baby sleep solutions for a calm feeding time!
Are There Any Allergies to Watch For?
Banana bread is generally safe, but watch for reactions to ingredients like wheat or eggs if introduced for the first time. My third child had a mild wheat sensitivity, so I started small. The KidsHealth feeding tips recommend monitoring for rashes or fussiness after eating.
Serving banana bread to your baby can be easy and fun. Always ensure it’s soft and in small pieces. Monitor your baby while eating to prevent choking. Use ripe bananas for natural sweetness without added sugar. Try including healthy toppings like yogurt.
Enjoy watching your baby discover new flavors and textures. It’s a wonderful way to introduce new foods. Happy feeding!
Have questions about feeding your baby? Feel free to reach out to us!
Taslima Khanam Sultana, a loving mom of three, founded BestBabyCart.com to help new parents navigate the world of baby products with ease. Her passion for making parenting simpler shines through delivering honest, unbiased reviews on must-haves like diapers, strollers, and feeding gear. Taslima’s mission is to empower families with expert tips, ensuring every product is safe and top-quality for your little one. Drawing from her own parenting journey, she’s dedicated to supporting yours!
Diaper Rash Remedies for Babies. Diaper rash can be a frustrating and uncomfortable experience for both you and your baby. The redness, irritation, and fussiness can make even the simplest tasks overwhelming.
You want nothing more than to see your baby happy and comfortable, but finding the right solution can sometimes feel like a daunting task. The good news is, you’re not alone, and there are effective remedies that can help soothe your baby’s sensitive skin.
Imagine the relief of seeing your baby giggle without a care in the world, free from the discomfort of diaper rash. Ready to discover simple, proven solutions that can make a world of difference for your little one? Let’s dive in and explore the best diaper rash remedies that can bring peace and comfort back to your home.
img: infographic of diaper rash remedies for babies, quick relief tips
Common Causes Of Diaper Rash
Diaper rash is a common issue for babies. It can cause discomfort and stress for both babies and parents. Understanding the common causes of diaper rash can help in preventing it. It also aids in finding effective remedies. Let’s explore the most frequent triggers of this condition.
1. Prolonged Exposure To Wetness
Wet diapers are a primary cause of diaper rash. When a baby’s skin stays wet for too long, it becomes irritated. The moisture breaks down the skin, making it more prone to rashes.
2. Friction From Diapers
The constant rubbing of a diaper against a baby’s delicate skin can lead to irritation. This friction creates redness and soreness, especially in sensitive areas.
3. Use Of Irritating Substances
Certain products can irritate a baby’s skin. These include harsh soaps, scented wipes, and even some types of diapers. They may contain chemicals that are too strong for a baby’s sensitive skin.
4. Introduction Of New Foods
Starting solid foods can change the acidity and composition of a baby’s stool. This change can trigger diaper rash. New foods may also lead to more frequent bowel movements, increasing the risk of rash.
5. Bacterial Or Yeast Infections
Diaper areas are warm and moist, making them ideal for bacteria and yeast. These microorganisms can cause infections, leading to more severe rashes.
6. Sensitive Skin
Some babies naturally have more sensitive skin. This sensitivity makes them more prone to diaper rash. It’s essential to use products that are gentle and hypoallergenic.
Cause
Description
Wetness
Skin breakdown due to prolonged exposure to moisture.
Friction
Rubbing the diaper against the skin is irritating.
Irritants
Harsh chemicals in products irritate the skin.
New Foods
Changes in stool due to the introduction of solids.
Infections
Bacterial or yeast infections in the diaper area.
Sensitive Skin
Natural sensitivity leading to higher rash risk.
By knowing these causes, you can better protect your baby. Prevention and careful product selection are key to keeping diaper rash at bay.
Preventive Measures
Diaper rash is a common concern for many parents. Babies have sensitive skin, making them prone to this uncomfortable condition. Understanding preventive measures can help keep your baby’s skin healthy. Following a consistent infant skincare routine, you can protect your child from diaper rash. Here, we’ll explore various strategies, offering effective baby skin care tips that align with pediatrician recommendations.
Prevention Of Diaper Rash
Preventing diaper rash starts with frequent diaper changes. Change your baby’s diaper as soon as it’s wet or soiled. This reduces prolonged exposure to moisture, a common cause of diaper rash. Using soft and absorbent diapers also helps.
Let your baby enjoy some diaper-free time. Fresh air can help keep the skin dry and prevent irritation. Simply lay your baby on a towel in a safe area, allowing their skin to breathe.
Infant Skincare Routine
A gentle skincare routine is vital. Use warm water and a soft cloth to clean your baby’s diaper area. Avoid wipes with alcohol or fragrances, as they can irritate sensitive skin. Pat the area dry with a soft towel.
Incorporate soothing ointments or diaper rash cream into your routine. Apply a thin layer to your baby’s clean, dry skin. This creates a barrier against moisture, reducing the risk of diaper rash.
Natural Remedies For Diaper Rash
Opt for natural remedies if your baby has sensitive skin. Coconut oil is a popular choice. Its antimicrobial properties can soothe and protect delicate skin. Apply a small amount to the affected area for relief.
Aloe vera gel is another effective option. It cools and soothes the skin, helping reduce redness and discomfort. Ensure the gel is pure and free from added chemicals.
Baby Health Tips
Ensure your baby’s clothes are loose and breathable.
Use mild detergent to wash their clothes and diapers.
Rinse clothes twice to remove all soap residues.
Pediatrician Recommendations
Consult your pediatrician for personalized advice. They can recommend specific diaper rash treatments suited to your baby’s needs. Always follow their guidance for effective and safe infant skincare.
Tips
Benefits
Frequent Diaper Changes
Reduces moisture exposure
Diaper-Free Time
Allows skin to breathe
Use of Soothing Ointments
Creates a moisture barrier
According to the AAP diaper rash advice, frequent diaper changes can help prevent irritation.
Natural Remedies
Diaper rash is a common issue that many parents face. It can cause discomfort and irritation for your little one. Fortunately, there are natural remedies that can help soothe diaper rash without harsh chemicals. These remedies use gentle ingredients that nurture and protect your baby’s delicate skin. Embracing natural solutions can be a comforting choice for Baby Skin Care. Let’s explore some effective options for Soothing Diaper Rash.
Coconut Oil
Coconut oil is a popular choice for Natural Remedies For Diaper Rash. It has antimicrobial and anti-inflammatory properties that can help soothe irritated skin. Applying coconut oil to the affected area creates a barrier, protecting the skin from further irritation.
Benefits:
Acts as a natural moisturizer
Contains lauric acid, which fights bacteria
Easy to apply and gentle on baby skin
Usage:
Clean the diaper area with warm water and mild soap.
Pat dry gently using a soft towel.
Apply a thin layer of coconut oil on the rash.
Regular use of coconut oil can be part of Diaper Rash Prevention Tips. It’s a cost-effective and gentle solution to incorporate into your routine.
Aloe Vera
Aloe Vera is well-known for its skin-healing properties. It’s a natural remedy that can provide relief for diaper rash. The soothing gel from the aloe plant helps cool and calm irritated skin. Aloe Vera is often included in Gentle Baby Products for its hydrating benefits.
How Aloe Vera Helps:
Feature
Benefit
Anti-inflammatory
Reduces redness and swelling
Moisturizing
Hydrates dry, cracked skin
Cooling effect
Soothes burning sensation
Application:
Extract fresh aloe gel from the plant.
Gently apply on the diaper rash.
Let it dry naturally before putting on a new diaper.
Aloe Vera can be a safe choice for Preventing Diaper Rash. It complements Pediatrician-Recommended Treatments effectively.
Oatmeal Baths
Oatmeal baths are a soothing option for Diaper Rash Treatment. Oatmeal contains saponins, which cleanse and moisturize the skin. Due to its calming effects, it has been used as a Home Remedy For Diaper Rash.
Benefits of Oatmeal Baths:
Relieves itching and irritation
Balances skin pH
Gentle enough for daily use
Steps to Prepare:
Grind oatmeal into a fine powder using a blender.
Fill a bathtub with warm water.
Add a cup of ground oatmeal to the water.
Let your baby soak for 10-15 minutes.
Oatmeal baths can be a key part of your Best Diaper Rash Creams routine. They offer a natural and gentle way to care for your baby’s skin.
Over-the-counter Treatments
Diaper rash can be a distressing experience for both babies and parents. Red, irritated skin can cause discomfort and sleepless nights. Many parents seek effective diaper rash remedies to soothe their baby’s sensitive skin. Over-the-counter treatments offer a convenient solution. These products are designed to provide relief and promote healing. They are readily available and can be used at home. Let’s explore some popular options.
Barrier Creams
Barrier creams play a crucial role in baby skin care. They create a protective layer on the skin, shielding it from moisture and irritants. This skin barrier protection is essential for diaper rash prevention. Common ingredients in barrier creams include zinc oxide and petroleum jelly. These compounds help to soothe and protect the skin.
Zinc Oxide: Known for its healing properties. It reduces irritation and promotes skin recovery.
Petroleum Jelly: Provides a thick barrier, keeping moisture away from the skin.
Parents often choose barrier creams for their ease of use. Simply apply a generous layer during diaper changes. This can help prevent the rash from worsening. For persistent rashes, consult a pediatrician for advice. Experts might recommend specific brands or formulations tailored for your baby.
Ingredient
Benefit
Zinc Oxide
Healing and soothing properties
Petroleum Jelly
Effective moisture barrier
Anti-fungal Ointments
Sometimes, diaper rash treatment requires more than a barrier. Fungal infections in infants can lead to stubborn rashes. In these cases, antifungal ointments are recommended. These ointments target fungal growth directly, reducing inflammation and irritation.
Common antifungal agents include:
Clotrimazole: Effective against yeast infections.
Miconazole: Another popular choice for treating fungal issues.
Using antifungal ointments requires careful application. Clean the affected area thoroughly before use. Apply a thin layer as directed by pediatric dermatology experts. These ointments can be combined with barrier creams for enhanced protection. Always monitor the rash for signs of improvement. If symptoms persist, seek medical advice.
Hydrocortisone Creams
Cortisone cream for babies is used to reduce inflammation. It is a mild steroid cream, effective for severe diaper rashes. While it can be a powerful tool in baby rash prevention, it must be used with caution.
Important considerations include:
Use sparingly and only for short periods.
Follow pediatric advice for dosage and application.
Monitor the skin closely for any adverse reactions.
Hydrocortisone creams are usually recommended for rashes that do not respond to other treatments. They can provide relief when other soothing ointments fail. Always consult a healthcare provider before using steroid creams on infants. This ensures safe and effective natural remedies for diaper rash.
When To See A Doctor For Diaper Rash
Most diaper rashes respond well to home remedies for diaper irritation and natural remedies for diaper rash. These include frequent diaper changes, gentle cleansing, and the use of soothing ointments for diaper rash. But sometimes, a rash may need professional attention.
Signs Of Infection
If the rash is red, swollen, or has blisters, it could indicate an infection. Look out for pus-filled bumps or open sores. These require a pediatrician-recommended rash solution. An infection can worsen if not treated promptly, so don’t delay in seeking help.
Rash Persists Despite Treatment
Applying the best diaper rash creams and using sensitive skin products for babies should show improvement within a few days. If the rash doesn’t heal or worsens after trying various diaper rash treatments, it’s time to consult a doctor.
Fever And Behavioral Changes
A diaper rash accompanied by a fever can indicate a more serious issue. If your baby seems more irritable or uncomfortable than usual, it’s worth getting a professional opinion. Preventing diaper rash with proper baby skin care is essential, but sometimes medical intervention is necessary.
Unusual Appearance
Rashes that appear very different from typical diaper rash, like those with a bright red color or unusual texture, should be evaluated. Sometimes, these can be allergic reactions needing specific care.
Rash Spreads Beyond Diaper Area
If the rash extends beyond the diaper area to other parts of the body, it may not be a simple diaper rash. This might require a specialized treatment approach that only a doctor can provide.
Understanding these signs will help you make informed decisions about your baby’s health. Always trust your instincts as a parent and seek medical advice when necessary.
For severe cases, the Mayo Clinic diaper rash treatment recommends consulting a doctor.
Tips For Diaper Changes
Diaper rash is a common issue that many parents face with their babies. Understanding how to effectively change diapers can help prevent skin irritation and keep your baby comfortable. Here are some practical tips for diaper changes that incorporate pediatrician advice and effective diapering techniques.
Pediatrician Advice
Consult with your pediatrician for tailored advice if rashes persist. They may recommend specific diaper rash creams or soothing ointments. Pay attention to any signs of allergies or infections, and follow your pediatrician’s guidance for baby skincare.
Skin Irritation
Skin irritation can cause discomfort and lead to rashes. Use healing ointments that form a protective barrier on the skin. Avoid overly wet wipes and let the skin dry naturally before putting on a fresh diaper.
Diapering Techniques
Mastering proper diapering techniques can prevent rash development. Clean the diaper area thoroughly with gentle strokes and apply a thin layer of diaper rash cream. Use natural remedies like coconut oil for extra protection.
Baby Skincare
Keep your baby’s skin healthy by using products designed specifically for infants. Choose baby wipes and skincare products labeled as hypoallergenic. Regularly check for signs of irritation and adjust products as needed.
Soothing Ointments
Apply soothing ointments to calm irritated skin. Look for ingredients like zinc oxide in diaper rash creams, which help reduce redness and inflammation. These ointments can provide immediate relief and promote healing.
Consider natural remedies for treating diaper rash. Use aloe vera or oatmeal baths to soothe the skin. These remedies can be gentle alternatives to chemical-based products and are often effective in calming irritation.
Healing Ointments
Healing ointments can speed up recovery from diaper rash. Apply a thin layer during each diaper change. Look for products with natural oils and vitamin E to nourish the skin and restore its natural barrier.
Baby Wipes
Choose baby wipes that are soft and free from harsh chemicals. Opt for unscented wipes to avoid further irritation. Always pat the skin dry instead of rubbing to prevent rash development.
Choosing The Right Diapers
Diaper rash can cause discomfort and distress for your baby. Choosing the right diapers plays a crucial role in keeping your baby’s skin healthy. With countless options available, selecting the best diaper can seem overwhelming. Understanding your baby’s skin needs and exploring various options can help prevent diaper rash. This section explores essential aspects to consider when picking the right diapers for your baby.
Quality And Material
High-quality diapers are essential for baby skin care. Look for diapers made from breathable materials. They help keep moisture away from the skin. Natural fibers like cotton are gentle on sensitive skin. Opt for diapers free from harsh chemicals to avoid irritation.
Absorbency Levels
Absorbency is a key factor in baby rash prevention. Choose diapers with high absorbency levels. They keep your baby’s skin dry and reduce the risk of diaper rash. Check for diapers with a wetness indicator. It helps you know when it’s time for a change.
Size And Fit
Ensure the diaper fits well. A proper fit prevents leaks and irritation. Use a size chart to determine the right size for your baby. A snug fit around the legs and waist is important. It minimizes friction and helps prevent diaper rash.
Eco-friendly Options
Using breathable cloth diapers can reduce irritation. Eco-friendly diapers are a great choice for sensitive skin products. They are often made from natural materials. These options are biodegradable and gentle on the skin. Switching to cloth diapers can be natural remedy for diaper rash.
Types Of Diapers
Type
Features
Disposable
Convenient, high absorbency, and wide availability
Seek pediatrician advice for choosing diapers. They can offer insights based on your baby’s skin condition. Experts recommend the best diaper creams and soothing ointments for diaper rash treatment. Professional guidance ensures your baby’s skin remains healthy.
Prevention Tips For Diaper Rash
Change diapers frequently to keep skin dry.
Use home remedies for diaper irritation, like coconut oil.
Ensure the diaper fits well to avoid friction.
Choose sensitive skin products for baby care.
Frequently Asked Questions
What Heals A Diaper Rash Fastest?
Apply a zinc oxide cream to soothe and protect the skin. Keep the area clean and dry. Frequent diaper changes reduce moisture. Allow skin to breathe by giving diaper-free time. Consult a pediatrician for a persistent rash.
What Is The Best Thing To Put On A Baby’s Diaper Rash?
Apply a zinc oxide cream to soothe diaper rash. Keep the area clean and dry. Use unscented wipes. Avoid tight diapers. Bathe the baby regularly with lukewarm water. Consult a pediatrician for persistent rashes.
What Is The Best Natural Remedy For Diaper Rash?
Coconut oil is an effective natural remedy for diaper rash. It soothes irritation and reduces inflammation. Apply a thin layer to the affected area after each diaper change. Its antibacterial and antifungal properties help prevent infection, promoting quick healing. Make sure the skin is clean and dry before application.
How Do You Stop A Diaper Rash Overnight?
Clean the affected area gently and pat dry. Apply a thick layer of zinc oxide cream. Use breathable, hypoallergenic diapers. Ensure frequent diaper changes to keep the area dry. Allow diaper-free time to promote healing.
Caring for diaper rash requires patience and gentle remedies. Keep your baby’s skin dry and clean. Use natural products to soothe irritation. Try a warm bath with oatmeal for relief. Frequent diaper changes help prevent rash. Air out the area to promote healing.
Consider consulting a pediatrician for persistent cases. Your baby’s comfort is the priority. These steps can ease discomfort and protect delicate skin. Stay attentive to your baby’s needs. Simple changes make a big difference. Your love and care ensure a happy, rash-free baby.
Taslima Khanam Sultana, a loving mom of three, founded BestBabyCart.com to help new parents navigate the world of baby products with ease. Her passion for making parenting simpler shines through delivering honest, unbiased reviews on must-haves like diapers, strollers, and feeding gear. Taslima’s mission is to empower families with expert tips, ensuring every product is safe and top-quality for your little one. Drawing from her own parenting journey, she’s dedicated to supporting yours!
Curious about your baby’s eye color? You’re not alone.
Hey there, excited parent-to-be or new mom and dad! Have you ever gazed into your baby’s eyes and wondered, “What color will they be?” It’s one of the most magical mysteries of parenthood! At BestBabyCart.com, we’re here to help you predict your baby’s beautiful eye color with a fun baby eye color calculator concept. From understanding the science of genetics to celebrating this special milestone, this guide is packed with insights, emotional support, and a digital tool to make the journey even more exciting. Let’s dive into the world of baby eye colors and uncover the beauty waiting for you!
This calculator considers the eye colors of both parents and even grandparents. It then uses this information to predict your baby’s eye color. This tool is both fun and educational. It allows you to explore the science behind genetics simply. Dive into the world of genetics and discover what eye color your little one might have.
How Does Baby Eye Color Work?
Your baby’s eye color isn’t just a random gift from nature—it’s a fascinating mix of genetics! Understanding the basics can help you predict what shade those little peepers might become.
Significance Of Eye Color
Eye color can tell a lot about our ancestry. It often reflects our genetic background. For many, eye color is a key part of identity. It adds to our uniqueness. Different cultures have different beliefs about eye color. Some even believe it can influence personality traits. Knowing your baby’s potential eye color can be a delightful part of expecting a child.
The Role of Genetics
Eye color is determined by genes passed down from you and your partner, primarily through the OCA2 and HERC2 genes. These genes control melanin production—the pigment that gives eyes their color. More melanin means darker eyes (brown), while less melanin results in lighter shades (blue or green).
Why Babies Are Born with Blue Eyes
Most babies are born with blue or gray eyes because melanin production in the iris doesn’t fully kick in until after birth. Over the first 6–12 months (sometimes up to 3 years!), their true eye color emerges as melanin levels adjust. It’s like a slow reveal of their unique beauty!
Parent 1
Parent 2
Possible Baby Eye Colors
Brown
Brown
Brown, Green, Blue
Brown
Blue
Brown, Green
Blue
Blue
Blue
Can You Predict Your Baby’s Eye Color?
While genetics can be tricky, a baby eye color calculator can give you a fun prediction based on your and your partner’s eye colors. Let’s explore how it works and what factors come into play.
The Baby Eye Color Calculator Explained
A baby eye color calculator uses basic genetic principles to estimate the likelihood of your baby’s eye color. You input your eye color, your partner’s eye color, and sometimes your parents’ eye colors for a more accurate guess. For example, two brown-eyed parents have a higher chance of a brown-eyed baby, but surprises like blue or green are possible if recessive genes are at play!
Factors That Influence Eye Color
Beyond your eye colors, other factors matter: family history (grandparents’ eye colors), mixed genetics (if you’re a carrier for blue eyes), and even lighting conditions that can make eyes appear in different shades. It’s not an exact science, but it’s a delightful way to dream about your baby’s future look.
Parent 1 Eye Color
Parent 2 Eye Color
Possible Baby Eye Colors
Brown
Brown
Brown, Green, Blue
Brown
Blue
Brown, Green
Blue
Blue
Blue
Eye color can sometimes change as the baby grows. This is due to the amount of melanin increasing over time. Typically, by the age of three, a child’s eye color will be set.
The Science Of Eye Color
Understanding the science behind eye color can be fascinating. Eye color is determined by genetics and the complex interplay of various factors. Let’s explore this in detail through two main aspects: Melanin and Pigmentation and Iris Structure.
Melanin And Pigmentation
Melanin is the key pigment that influences eye color. It is found in the iris of the eye. The amount and type of melanin present determine whether eyes are blue, green, brown, or another color.
There are two types of melanin:
Eumelanin: This type is responsible for darker colors, like brown and black.
Pheomelanin: This type influences lighter shades, such as green and hazel.
More melanin usually means darker eyes. Less melanin results in lighter-colored eyes. A baby’s eye color can change over time as melanin levels increase or decrease.
Iris Structure
The iris is the colored part of the eye. It controls the size of the pupil and determines eye color. The structure of the iris, which includes layers of cells and fibers, also plays a role in how eye color appears.
Some key elements of the iris structure include:
Stroma: This is the front layer of the iris, containing cells and blood vessels.
Epithelium: This is the back layer, which has pigment cells that contribute to eye color.
Light scattering in the stroma can affect the perceived color. For example, blue eyes have little melanin and appear blue because of light scattering. Brown eyes have more melanin, which absorbs more light, making the eyes appear darker.
Genetics play a major role in determining the structure and pigmentation of the iris. The combination of genes from both parents will influence a baby’s eye color, making each set of eyes unique.
Factors Influencing Eye Color
The color of a baby’s eyes is a fascinating topic. Many parents wonder what their baby’s eye color will be. Several factors influence eye color. This section will discuss some of the key factors that determine eye color.
Parental Eye Color
One of the most important factors influencing a baby’s eye color is the eye color of their parents. If both parents have blue eyes, the baby is likely to have blue eyes. If one parent has brown eyes and the other has blue eyes, the baby may have a range of eye colors.
Parental Eye Color Combination
Possible Baby Eye Color
Both parents with blue eyes
Blue
One parent with brown eyes, one with blue eyes
Brown, blue, or green
Both parents with brown eyes
Brown, green
Genetic Variations
Genetic variations also play a significant role. Eye color is a polygenic trait, meaning multiple genes influence it. The most well-known genes are OCA2 and HERC2. These genes determine the amount of melanin in the iris. More melanin means darker eyes.
Here is a simple breakdown:
OCA2 Gene: Influences the amount of melanin
HERC2 Gene: Controls the expression of the OCA2 gene
Even with these genes, eye color can still vary. This is due to additional genetic factors and mutations.
Common Eye Colors In Babies
Babies often amaze us with their cute looks and sparkling eyes. One of the most exciting aspects is predicting their eye color. Different factors like genetics play a role. Let’s explore the common eye colors in babies.
Blue Eyes
Many babies are born with blue eyes. This is because they have low melanin at birth. As they grow, the melanin levels can increase. This can change the eye color. Some babies keep their blue eyes. Blue eyes are often seen in families with lighter skin tones.
Brown Eyes
Brown is the most common eye color worldwide. Babies with brown eyes have more melanin in their irises. This color can appear at birth or develop over time. Brown eyes are dominant genetically. This means if one parent has brown eyes, the baby is likely to have them too.
Green And Hazel Eyes
Green and hazel eyes are less common. They are often a mix of blue and brown eye genes. Babies with green or hazel eyes have moderate melanin levels. These colors may take months or years to fully develop. Green and hazel eyes can show flecks of different colors.
Changes In Eye Color Over Time
Understanding how a baby’s eye color changes over time can be fascinating. Many parents eagerly watch their child’s eyes, curious about what color they will become. The transformation from birth to the final color is a gradual and intriguing process.
Infant To Toddler Transition
Most babies are born with blue or gray eyes. This is due to the lack of melanin in their irises. As they grow, melanin production increases. This can change their eye color. By six months, you may notice some changes. The eyes might start to darken. This is especially true for babies with darker skin.
During the first year, the eyes can change dramatically. By the time a baby turns one, the eye color may still be changing. Sometimes, it takes up to three years for the final color to appear. Keep an eye on your little one’s eye color as they grow. It can be an exciting journey.
Permanent Eye Color
By the age of three, most children’s eye color is set. The melanin levels in the iris have stabilized. This determines the permanent eye color. If a child has brown eyes by this age, they will likely stay brown. The same goes for blue and green eyes.
Genetics play a big role in eye color. Parents’ eye colors can give clues about their child’s final eye color. But the exact color can still be a surprise. Remember, every child is unique. Their eye color journey is just one part of their unique story.
Fun Facts About Baby Eye Color
Babies are fascinating! One intriguing feature is their eye color. Parents often wonder what color their baby’s eyes will be. Here are some fun facts that might surprise you.
Rare Eye Colors
While many babies are born with brown or blue eyes, some have rare colors. These unique shades are less common and make a baby stand out.
Eye Color
Percentage of Population
Green
2%
Gray
1%
Amber
0.5%
Red/Violet
Extremely Rare
Green eyes are often seen in people of European descent. Gray eyes are less common and can appear blue in certain lighting. Amber eyes have a golden or copper hue. Red or violet eyes are usually due to a condition called albinism.
Celebrity Eye Colors
Many celebrities are known for their striking eye colors. Let’s explore a few famous faces.
Elizabeth Taylor – Violet eyes
David Bowie – One blue eye, one brown eye
Emma Stone – Green eyes
Mila Kunis – One brown eye, one green eye
Elizabeth Taylor had a rare violet eye color due to a genetic mutation. David Bowie had anisocoria, giving him one blue and one brown eye. Emma Stone and Mila Kunis both have unique and stunning eye colors that many admire.
Eye color can be a fun topic to explore. Each color holds its own unique charm and beauty. Whether your baby’s eyes are brown, blue, or a rare shade, they will surely be captivating!
Emotional Support for Expectant Parents
Waiting to see your baby’s eye color is an exciting part of parenthood, but it can also come with a mix of emotions. Let’s navigate this together.
Enjoy the Anticipation
It’s okay to feel a flutter of curiosity or even impatience! Predicting your baby’s eye color is a fun way to connect with your little one before their traits fully emerge. Savor this special time—it’s a once-in-a-lifetime experience.
Share the Joy
Connect with other parents on X or in parenting groups to share your predictions and excitement. Use hashtags like #BabyEyeColor or #NewParentJoy to find others who are just as thrilled to guess their baby’s features.
FAQs About Baby Eye Color Prediction
Can a baby eye color calculator be accurate?
It’s not 100% accurate since genetics can be complex, but it gives a fun estimate based on probabilities. Your baby’s true eye color may still surprise you!
When will my baby’s eye color be permanent?
Most babies’ eye colors settle by 6–12 months, but changes can happen up to age 3 as melanin develops. Keep watching for those magical shifts!
Can two brown-eyed parents have a blue-eyed baby?
Yes, if both parents carry the recessive blue-eye gene, there’s a 25% chance their baby could have blue eyes. Genetics are full of surprises!
Does family history affect eye color?
Absolutely! Grandparents’ eye colors can influence your baby’s eye color if recessive genes are passed down. Include family history for better predictions.
Are green eyes common in babies?
Green eyes are rare, occurring in less than 2% of the population. They’re more likely if one parent has green or hazel eyes, but they’re still a special surprise!
How Does A Baby Eye Color Calculator Work?
A baby eye color calculator uses genetic information. It predicts the probability of a baby’s eye color. It considers parents’ eye colors and genetic patterns.
Can Eye Color Change After Birth?
Yes, a baby’s eye color can change. It often changes within the first year. This is due to pigment development.
What Factors Influence Baby Eye Color?
Genetics play a major role. Parents’ eye colors and family history are key factors. Pigment production also influences.
Conclusion
Guessing your baby’s eye color is a heartwarming part of the parenting journey, and we’re so excited to share it with you! At BestBabyCart.com, we’re here to support you with fun tools, expert insights, and resources to make every moment magical. Download our Baby Eye Color Predictor Tool, share your predictions with loved ones, and celebrate the beauty of your baby’s unique eyes—no matter the shade!
Taslima Khanam Sultana, a loving mom of three, founded BestBabyCart.com to help new parents navigate the world of baby products with ease. Her passion for making parenting simpler shines through delivering honest, unbiased reviews on must-haves like diapers, strollers, and feeding gear. Taslima’s mission is to empower families with expert tips, ensuring every product is safe and top-quality for your little one. Drawing from her own parenting journey, she’s dedicated to supporting yours!
Ready to introduce solids to your baby? 😊 This guide covers when to start, what foods to offer, how to feed safely, and tips for success. With practical steps, visuals, and expert advice, you’ll feel confident helping your little one explore new flavours and how to Introduce Solids to Baby.
Hey, new parents! 😄 Watching your baby grow is pure magic, and now you’re at an exciting milestone—introducing solids! As a mom running BestBabyCart.com, I remember the joy (and nerves!) of seeing my little one taste pureed carrots for the first time. It’s a big step, filled with questions like “When do I start?” “What foods are safe?” or “How do I avoid allergies?” Don’t worry—this mom-to-mom guide is here to make it fun, safe, and stress-free. Packed with expert tips on timing, foods, methods, and more, you’ll have everything you need to start your baby’s food journey with love and confidence. Let’s dive in!
Why Introducing Solids Is a Big Deal
Starting solids around 6 months is a key step in your baby’s growth. It’s not just about food—it’s about:
Nutrition: Solids add iron, zinc, and vitamins as breastmilk or formula alone isn’t enough past 6 months.
Development: Chewing and swallowing build oral skills for speech.
Exploration: New flavors spark curiosity and healthy eating habits.
Family Bonding: Mealtime becomes a shared adventure!
With 90% of babies starting solids by 7 months (per CDC), getting it right sets your baby up for a lifetime of good health. Let’s explore how to do it safely and joyfully.
Image: Happy baby in a highchair tasting pureed food.
When to Start Solids: Timing It Right
Wondering when your baby is ready? Most babies are ready around 6 months, but every little one is unique. Look for these signs, per the American Academy of Pediatrics:
Signs Your Baby Is Ready
Sits Up: Can sit with support and hold head steady.
Shows Interest: Reaches for your food or watches you eat.
Tongue Control: No longer pushes food out with tongue (tongue-thrust reflex fades).
Chewing Motion: Mimics chewing or smacks lips.
Age Guide: Start at 6 months for most babies, but some may be ready at 4–5 months with pediatrician approval. Preemies may need to wait longer.
Why 6 Months Is Ideal
Gut Health: Babies’ digestive systems mature by 6 months, reducing allergy risks.
Iron Needs: Breastmilk iron drops after 6 months; solids like fortified cereals fill the gap.
Safety: Waiting reduces choking risks, as babies gain better swallowing skills.
Talk to Your Pediatrician: Always check with your doctor, especially if your baby has health conditions or was born early.
Checklist: Is My Baby Ready for Solids?
☐ Sits with support and holds head steady.
☐ Shows interest in food (reaches or watches).
☐ No tongue-thrust reflex.
☐ Mimics chewing or smacks lips.
☐ Pediatrician gives the green light.
Checklist titled ‘Is My Baby Ready for Solids?
Choosing the Best First Foods
Your baby’s first foods should be nutrient-rich, easy to digest, and safe. Here’s how to pick winners.
Top First Foods (6–8 Months)
Start with single-ingredient, smooth purees to watch for reactions:
Iron-Rich: Fortified baby cereal (e.g., Gerber) mixed with breastmilk or formula.
Fruits: Pureed apple, pear, or banana for sweetness.
Veggies: Steamed and pureed carrots, sweet potatoes, or peas.
Proteins: Pureed lentils or mashed avocado for healthy fats.
Serving Tip: Offer 1–2 teaspoons at first, increasing to 2–4 tablespoons as baby adjusts.
Foods to Avoid
Honey: Risk of botulism under 1 year.
Cow’s Milk: Hard to digest until 12 months.
Choking Hazards: Whole grapes, nuts, popcorn, or raw carrots.
High-Sodium/Sugar: Skip processed foods or sweets.
Allergy Watch: Introduce common allergens (e.g., peanut butter, eggs) one at a time, per National Institute of Allergy and Infectious Diseases. Wait 3–5 days before new foods to spot reactions.
Infographic: Colorful chart of first foods like pureed carrots, apples, and cereal.
How to Introduce Solids: Step-by-Step
Ready to feed your baby? Follow these steps for a smooth start.
Step 1: Gather Your Gear
Highchair: Stable and easy to clean, like Graco.
Spoons: Soft-tipped, baby-sized (e.g., Munchkin).
Bowls: Non-slip, BPA-free (e.g., Pyrex).
Bibs: Waterproof for easy cleanup (e.g., Bumkins).
Step 2: Choose the Right Time
Mood: Feed when baby is happy and alert, not sleepy or fussy.
Timing: Mid-morning or after a small milk feed works best.
Setting: Quiet, distraction-free space for focus.
Step 3: Start Small
Offer 1–2 teaspoons of a single-ingredient puree (e.g., Gerber oatmeal).
Use a soft spoon, letting baby taste at their pace.
Follow with breastmilk or formula to keep milk as the main nutrition source.
Step 4: Watch for Cues
Likes: Leaning forward, opening mouth.
Dislikes: Turning away, spitting out, or crying. Stop and try again later.
Reactions: Monitor for rashes, vomiting, or diarrhea (call your doctor if severe).
Step 5: Build Variety
Introduce one new food every 3–5 days.
Mix textures (e.g., lumpy purees by 7–8 months) to develop chewing skills.
Offer 2–3 meals daily by 9 months, plus milk feeds.
Image: Baby Starting Solid Bundle
Baby-Led Weaning vs. Purees: Which to Choose?
Not sure whether to spoon-feed or let baby self-feed? Here’s a breakdown.
Purees (Traditional Spoon-Feeding)
Pros: Easy to control portions, less mess, good for early iron-rich foods.
Cons: Slower transition to textures, more prep time.
Best For: Parents who want gradual introduction or babies with developmental delays.
Baby-Led Weaning (BLW)
Pros: Encourages self-feeding, motor skills, and texture exploration.
Cons: Messier, higher choking risk if foods aren’t soft.
Best For: Babies 6+ months who sit well and show strong chewing cues.
Hybrid Approach: Many parents mix both—offer purees with a spoon and soft finger foods (e.g., banana strips) to balance benefits.
Safety Tip: For BLW, use soft, palm-sized foods like steamed broccoli or avocado wedges. Always supervise closely.
Keeping It Safe: Food Safety and Allergies
Safety first! Here’s how to protect your baby during mealtimes.
Prevent Choking
Food Prep: Offer soft, mashed, or pureed textures; avoid round or hard foods like whole grapes.
Supervision: Always watch baby while eating.
Positioning: Use a highchair (e.g., Graco) for upright sitting.
Be Prepared: Learn infant CPR through a Red Cross class.
Manage Allergies
Early Introduction: Offer allergens like peanuts or eggs between 6–12 months (per NIAID).
Test Slowly: Introduce one new food at a time, waiting 3–5 days.
Monitor: Look for hives, swelling, or breathing issues. Call 999 for severe reactions.
Stay Hygienic
Wash hands, utensils before prep.
Store purees in Pyrex containers; refrigerate leftovers for up to 2 days.
Discard uneaten food after 1–2 hours to prevent bacteria.
Progressing with Solids: 9–12 Months
By 9 months, your baby’s ready for more variety and textures. Here’s how to keep it fun.
New Textures
Lumpy Purees: Transition to thicker mashes (e.g., mashed peas).
Finger Foods: Soft cubes of tofu, steamed carrots, or cheerios.
Self-Feeding: Let baby use hands or try a Munchkin spoon.
Meal Schedule
3 Meals + Snacks: Offer solids 3 times daily, plus 1–2 snacks.
Milk Balance: Continue 24–32 oz of breastmilk or formula, reducing as solids increase.
Variety: Include all food groups—grains, fruits, veggies, proteins, dairy.
Encourage Exploration
Offer Choices: Put 2–3 foods on the tray (e.g., banana slices, oatmeal).
Model Eating: Eat together to show chewing and enjoyment.
Be Patient: Babies may need 10–15 tries to like a food (per HealthyChildren.org).
Image: Feeding schedule and food ideas for 9–12 month babies
Troubleshooting Common Challenges
Hitting bumps? Here’s how to handle common issues.
Refusing Foods
Why: Babies may dislike textures or be full from milk.
Fix: Offer small portions, mix with familiar foods, or try at a different time.
Tip: Avoid forcing; keep mealtime positive.
Constipation
Why: New foods like bananas or rice cereal can firm stools.
Fix: Offer prunes, pears, or water (4–6 oz daily by 6 months).
When to Call: If stools are hard or absent for 3+ days, consult your doctor.
Messy Eating
Why: Babies explore with their hands and mouths.
Fix: Use a Bumkins bib and a splash mat under the highchair.
Embrace It: Mess is learning! Keep a camera ready for cute moments.
FAQ: How to Introduce Solids to Baby
Q: When should I start solids? A: Around 6 months, when the baby sits with support and shows interest. Check with your paediatrician.
Q: What’s the best first food? A: Single-ingredient purees like Gerber cereal, carrots, or avocado.
Q: Can I do baby-led weaning instead of purees? A: Yes, for 6+ month babies who sit well. Offer soft finger foods and supervise.
Q: How do I prevent food allergies? A: Introduce allergens like peanuts early (6–12 months), one at a time, per NIAID.
Q: What if my baby refuses solids? A: Try small portions, mix with familiar foods, and stay patient. Don’t force it.
Q: How much should my baby eat? A: Start with 1–2 teaspoons, increasing to 2–4 tablespoons per meal by 8 months.
Q: How do I handle gagging? A: Gagging is normal; ensure soft foods and supervise. Learn CPR from Red Cross for safety.
Q: How Many Times A Day Should A Baby Feed When Starting Solids?
Babies typically eat solids once or twice a day when starting. Gradually increase as they become comfortable. Balance solids with breast milk or formula to meet nutritional needs. Observe your baby’s hunger cues and adjust feeding times accordingly. Consult with a paediatrician for personalised guidance.
Q: How Long Does It Take For A Baby To Get Used To Solids?
Babies usually adjust to solids within a few weeks. Every baby is different, and some may take longer. Gradually introduce new textures and flavors to help them adapt. Monitor for any allergic reactions or discomfort, and consult a paediatrician if needed.
Q: Which Food to Give To A 4-Month-Old Baby?
Introduce pureed fruits and vegetables, like bananas and carrots, to a 4-month-old baby. Offer iron-fortified rice cereal mixed with breast milk or formula. Ensure food is smooth, avoiding chunks or lumps. Consult your paediatrician before starting solid foods to ensure safety and proper nutrition for your baby.
You’re Nailing This Milestone!
Parents, you’re doing amazing! 😊 Introducing solids is a joyful step in your baby’s growth, and with these expert tips, you’re set to make it fun, safe, and nutritious. From first purees to finger foods, you’re building a healthy eater. What’s your baby’s favourite food so far? Share in the comments—we’re cheering you on!
Taslima Khanam Sultana, a loving mom of three, founded BestBabyCart.com to help new parents navigate the world of baby products with ease. Her passion for making parenting simpler shines through delivering honest, unbiased reviews on must-haves like diapers, strollers, and feeding gear. Taslima’s mission is to empower families with expert tips, ensuring every product is safe and top-quality for your little one. Drawing from her own parenting journey, she’s dedicated to supporting yours!
How to Increase Milk Supply Naturally.Increasing milk supply naturally involves simple, effective strategies. Many mothers face challenges with milk production.
Understanding your body and its needs can help. Breastfeeding is a journey filled with joy and challenges. For many new moms, ensuring a steady milk supply is a top concern. Natural methods can offer peace of mind and support your body’s natural rhythms.
Why Milk Supply Matters
A healthy milk supply ensures your baby gets the nourishment they need to thrive. Low milk supply can stem from various factors, including stress, dehydration, hormonal changes, or improper latch. The good news? Your body is designed to produce milk, and with the right techniques, you can enhance your supply naturally. Let’s explore how to make that happen.
Understanding Milk Supply: Supply and Demand
Breast milk production works on a supply-and-demand system. The more your baby nurses (or you pump), the more milk your body is signaled to produce. This is because breastfeeding stimulates the release of prolactin, the hormone responsible for milk production. If you’re noticing a dip in supply, it might be due to infrequent feeding, poor latch, or external factors like stress. Don’t worry—we’ll cover actionable steps to get things flowing.
Proven Techniques to Increase Milk Supply Naturally
Here’s a comprehensive breakdown of natural methods to boost your milk supply, from lifestyle tweaks to dietary changes and breastfeeding techniques.
1. Optimize Breastfeeding Techniques
The foundation of a robust milk supply starts with effective breastfeeding practices. Here’s how to ensure you’re maximizing milk removal, which signals your body to produce more.
Ensure a Proper Latch
A good latch is critical for efficient milk transfer. If your baby isn’t latching correctly, they may not be stimulating milk production effectively. Signs of a proper latch include:
Your baby’s mouth covers most of the areola, not just the nipple.
Their lips are flanged outward, like a fish.
You hear swallowing sounds and don’t feel pain.
Tip: Work with a lactation consultant to perfect your baby’s latch. They can provide hands-on guidance tailored to you and your baby.
Nurse on Demand
Frequent nursing is key to boosting supply. Aim to breastfeed every 2–3 hours, or whenever your baby shows hunger cues (like rooting or sucking on their hands). Night feeds are especially important, as prolactin levels peak during the early morning hours.
Try Switch Nursing
Switch nursing involves alternating breasts multiple times during a single feeding session. This keeps your baby actively sucking, which stimulates milk production. For example:
Start on one breast for 5–10 minutes.
Switch to the other breast.
Repeat 1–2 times per side.
ga-3s. B vitamins are necessary for energy and metabolism. Whole grains and lean meats provide these vitamins.
Breast milk is about 87% water, so staying hydrated is non-negotiable. Aim for at least 8–10 cups of water daily, and keep a water bottle handy during nursing sessions. Other hydrating options include herbal teas (like fenugreek or fennel) or coconut water.
Eat a Balanced Diet
A nutrient-rich diet supports milk production. Focus on:
Protein: Eggs, lean meats, beans, and tofu.
Healthy fats: Avocados, nuts, seeds, and olive oil.
Complex carbs: Oats, brown rice, and quinoa.
Galactagogues: Foods like oats, brewer’s yeast, and flaxseeds are known to boost milk supply.
Pro Tip: Try a lactation smoothie with oats, spinach, berries, and almond milk for a nutrient-packed boost.
Lactation-Boosting Smoothie Recipe
markdownShow inline
3. Incorporate Galactagogues
Galactagogues are foods, herbs, or supplements that may increase milk production. While not a magic bullet, they can support your efforts when combined with proper breastfeeding techniques.
Herbal Galactagogues
Fenugreek: A popular herb, often taken as tea or capsules. Start with a low dose and monitor for side effects like gas.
Blessed Thistle: Often paired with fenugreek to enhance milk production.
Fennel Seeds: Chew a teaspoon after meals or brew as tea for a gentle boost.
Note: Consult your healthcare provider before starting any herbal supplements, especially if you’re on medication or have health conditions.
Food-Based Galactagogues
Incorporate these into your diet:
Oats (think oatmeal or lactation cookies)
Brewer’s yeast (add to smoothies or baked goods)
Dark leafy greens (spinach, kale)
Almonds and sesame seeds
4. Pump Strategically
Pumping can be a game-changer for increasing milk supply, especially if your baby isn’t nursing frequently enough.
Power Pumping
Power pumping mimics cluster feeding, which signals your body to produce more milk. Here’s a sample schedule:
Pump for 20 minutes.
Rest for 10 minutes.
Pump for 10 minutes.
Rest for 10 minutes.
Pump for 10 minutes.
Repeat this cycle for an hour, once or twice daily.
Pump After Feedings
If your baby doesn’t fully empty your breasts, pump for 5–10 minutes after feedings to stimulate further production.
Power Pumping Flowchart
pngShow inline
5. Manage Stress and Rest
Stress can reduce oxytocin, the hormone that triggers milk letdown. Prioritizing self-care is crucial for maintaining a healthy supply.
Practice Relaxation Techniques
Deep Breathing: Take 5 minutes to breathe deeply before nursing.
Meditation or Yoga: Even 10 minutes daily can lower stress levels.
Warm Compress: Apply a warm towel to your breasts before feeding to encourage letdown.
Prioritize Sleep
Lack of sleep can disrupt hormone levels, impacting milk production. Nap when your baby naps, and ask for help with household tasks to carve out rest time.
6. Seek Support
You don’t have to navigate this journey alone. Support from professionals and loved ones can make a big difference.
Consult a Lactation Consultant
A certified lactation consultant (IBCLC) can assess your breastfeeding technique, address latch issues, and create a personalized plan to boost your supply.
Join a Support Group
Connecting with other breastfeeding moms can provide emotional support and practical tips. Look for local or online groups through organizations like La Leche League.
Common Myths About Milk Supply
Let’s debunk a few myths that might be causing unnecessary worry:
Myth: Drinking more water will directly increase milk supply. Truth: Hydration supports overall health, but overhydration won’t boost supply beyond what your body needs.
Myth: You need to eat specific foods to make milk. Truth: A balanced diet is enough; galactagogues are a bonus, not a requirement.
Myth: Low supply is common. Truth: True low supply is rare. Most concerns stem from misinterpreting baby’s cues or normal variations in supply.
Impact Of Sleep On Supply
Sleep plays a significant role in maintaining your milk supply. Lack of sleep can increase stress levels and negatively affect your milk production. Prioritize getting enough rest whenever you can.
Try napping when your baby naps. It may feel challenging, but even a short rest can refresh you and help maintain your energy levels.
Consider enlisting help at night. A partner or family member can assist with non-feeding tasks, allowing you to get more uninterrupted sleep. How can you adjust your routine to ensure better rest?
Managing stress and ensuring adequate sleep can make a noticeable difference in your milk supply. Which of these strategies will you try first to enhance your breastfeeding experience?
Herbal Remedies
Herbal remedies have been cherished for centuries for their ability to support and enhance various aspects of health. When it comes to boosting milk supply naturally, these remedies can be a gentle and effective option. Many nursing mothers find comfort in the idea of using herbs, as they often offer a holistic approach to lactation. But how do these herbs actually help, and what should you keep in mind to use them safely?
Safe Herbal Usage
While herbs are natural, you must use them wisely. How do you ensure you’re not overdoing it?
It’s vital to research each herb thoroughly and consult with a healthcare provider. Dosage and frequency matter greatly.
Consider starting with small amounts and observing how your body responds. Every person is different, and what works for one might not work for another.
Remember, the key is balance. Would you add salt to a dish without tasting it first? The same cautious approach applies here.
So, how do you know if herbal remedies are the right choice for you? Ask yourself if you’re ready to embrace a natural approach and if you’re prepared to monitor your body’s cues. With mindfulness and care, herbal remedies can be a wonderful ally in your breastfeeding journey.
Exercise And Physical Health
Exercise and physical health play a crucial role in boosting your milk supply naturally. When your body is in good shape, it can work more efficiently, including producing milk for your baby. Staying active and maintaining a healthy lifestyle can positively influence your milk production. But how does exercise impact hormones, and what activities can you do? Let’s dive into these topics.
Impact On Hormones
Your hormones are the directors behind the scenes of milk production. Engaging in regular exercise can help balance these hormones. For instance, working out can reduce stress hormones like cortisol, which may interfere with milk supply. Lower stress levels can lead to more efficient milk production.
Exercise also boosts endorphins, often referred to as the ‘happy hormones’. When you feel good, your body can focus more on producing milk. Have you ever noticed how a brisk walk or a gentle yoga session lifts your mood? That happiness can translate into a more robust milk supply.
Recommended Activities
Not all exercises are created equal, especially when considering their impact on your milk supply. Light activities such as walking, swimming, or cycling can be beneficial. These exercises are gentle on the body and can be easily integrated into your daily routine.
Consider yoga or pilates as well. These are excellent for maintaining flexibility and reducing stress. A friend of mine once shared how yoga helped her stay calm during breastfeeding, ultimately supporting her milk production. Try a simple routine at home, and see how it feels.
Remember, the goal is to keep your body healthy without overexerting yourself. How can you make exercise a regular part of your day without feeling overwhelmed? Reflect on what activities you enjoy and how they fit into your life. It’s about finding a balance that works for you.
Support Systems
Boosting milk supply naturally involves staying hydrated and eating balanced meals. Regular breastfeeding can also help. Rest and relaxation play a vital role in supporting milk production.
Increasing milk supply naturally can feel like a daunting task, but having the right support systems in place can make a significant difference. Whether you’re a new mom or someone who’s been breastfeeding for a while, knowing where to turn for help is crucial. Support systems offer guidance, encouragement, and resources that can ease the journey and help you achieve your breastfeeding goals.
Community Resources
Community resources are invaluable when it comes to increasing your milk supply. Local breastfeeding support groups can connect you with other moms who are going through similar experiences. Sharing stories and tips can be both comforting and educational.
Online forums and social media groups can also provide a sense of community. These platforms allow you to ask questions anytime and get responses from moms worldwide. It’s like having a 24/7 support network.
Libraries and community centers often host free workshops and classes. These can be great opportunities to learn more about breastfeeding and meet other parents. Have you checked out what’s available in your area?
Remember, you’re not alone on this journey. Building a robust support system can be the key to successfully increasing your milk supply.
Frequently Asked Questions
How Can I Increase My Milk Supply Fast?
Boost milk supply by nursing often and staying hydrated. Consume lactation-friendly foods like oats and fennel. Ensure proper latch and consult a lactation expert. Rest well and avoid stress to support production. Use breast pumps to stimulate additional supply.
Which Foods Help Increase Breast Milk?
Oats, fenugreek, and almonds boost breast milk supply. Dark leafy greens and garlic enhance lactation. Flaxseed and sesame seeds support milk production. Include carrots and chickpeas for added benefits. Drink plenty of water to stay hydrated.
What Is The 4 4 4 Rule For Breast Milk?
The 4 4 4 rule for breast milk involves storing fresh milk for 4 hours at room temperature, refrigerating for 4 days, and freezing for 4 months. This guideline helps preserve the milk’s quality and ensures safety for infant consumption.
What Can I Drink To Produce More Milk?
Drink water, herbal teas like fenugreek or fennel, and milk-boosting smoothies. Oat milk and almond milk can also help. Hydration is crucial for milk production, so ensure you drink enough fluids daily. Consult a healthcare provider for personalized advice on lactation-friendly beverages.
Conclusion
Boosting milk supply naturally takes patience and consistency. Small changes can help. Try increasing your water intake. Eat nutritious foods regularly. Relax and rest whenever possible. Stress can affect milk production. Breastfeed more often to stimulate supply. Consider using herbal supplements.
Consult a healthcare professional before starting any new regimen. Your efforts can make a difference. Each mom is unique. Find what works best for you. Trust your body. Embrace the journey. Remember, you’re doing great. Keep nourishing your little one with love and care.
Taslima Khanam Sultana, a loving mom of three, founded BestBabyCart.com to help new parents navigate the world of baby products with ease. Her passion for making parenting simpler shines through delivering honest, unbiased reviews on must-haves like diapers, strollers, and feeding gear. Taslima’s mission is to empower families with expert tips, ensuring every product is safe and top-quality for your little one. Drawing from her own parenting journey, she’s dedicated to supporting yours!
Hey there, mama! If you’re reading this, you’re probably wondering how to stop your baby from snack feeding while breastfeeding—and I totally get it. Those quick, frequent nursing sessions can feel like a never-ending cycle, leaving you exhausted, overwhelmed, and maybe even a little frustrated. As a mom of three and the founder of BestBabyCart.com, I’ve been there, and I’m here to help you through this transition with love, patience, and expert tips.
Snack feeding—where your baby nurses for just a few minutes at a time, often for comfort rather than hunger—can disrupt your routine and make breastfeeding feel like a full-time job. But don’t worry! With the right strategies, you can gently guide your little one toward longer, more satisfying feeds while still meeting their emotional needs. In this guide, we’ll walk through why babies snack feed, how to recognize when it’s time to stop, and practical steps to make the shift, plus some emotional support for you, because you’re doing an amazing job.
Why Does My Baby Snack Feed While Breastfeeding?
Before we dive into how to stop snack feeding, let’s talk about why your baby might be doing it in the first place. Understanding the reasons can help you approach this transition with empathy and confidence.
Comfort and Soothing
Breastfeeding isn’t just about food—it’s also about comfort. Your baby might snack feed because they find nursing soothing, especially during stressful moments like teething, growth spurts, or when they’re feeling tired or overwhelmed. Those quick sessions are like a warm hug from you, and that’s a beautiful thing!
Hunger or Growth Spurts
Sometimes, snack feeding happens because your baby is genuinely hungry more often, especially during growth spurts (common around 3 weeks, 6 weeks, 3 months, and 6 months). Their tiny tummy might need frequent top-ups, but if this becomes a habit, it can lead to a cycle of short, unsatisfying feeds.
Distractions or Overstimulation
As babies get older (around 4-6 months), they become more curious about the world. If your baby is easily distracted by noises, lights, or movement, they might pop on and off the breast, treating nursing like a quick snack rather than a full meal.
Supply and Demand Imbalance
If your milk supply is low or your baby isn’t latching properly, they might not get enough milk during a feed, leading to frequent nursing. This can also happen if your baby is used to snacking and hasn’t learned to take fuller feeds.
When Is It Time to Stop Snack Feeding?
Snack feeding isn’t always a problem, especially in the early weeks when your baby’s stomach is tiny, and they must nurse often. But as they grow, you might notice signs that it’s time to encourage longer, more structured feeds.
Your baby is over 6 months and still nursing every hour or two for just a few minutes.
You’re feeling drained, overwhelmed, or resentful about the constant nursing.
Your baby isn’t gaining weight as expected, or they seem fussy and unsatisfied after feeds.
You’re ready to introduce solids or a more predictable feeding schedule.
If any of these sound familiar, it might be time to guide your baby away from snack feeding gently. Don’t worry—this doesn’t mean you’re taking away their comfort. It’s about finding a balance that works for both of you.
Image: Signs It’s time to stop Snack feeding!
How to Stop Baby Snack Feeding Breastfeeding: 7 Gentle Steps
Now that we’ve covered the why and when, let’s get to the how. These steps are designed to be gentle and gradual, ensuring your baby feels loved and secure while you transition to a more sustainable breastfeeding routine.
Step 1: Observe and Track Feeding Patterns
Start by keeping a simple log of your baby’s feeding times for a few days. Note when they nurse, how long each session lasts, and whether they seem hungry or just seeking comfort. This will help you identify patterns, like if they always snack feed before naps or when they’re bored. At BestBabyCart.com, we recommend using a feeding journal or app to make this easier. It’s a game-changer for spotting trends!
Step 2: Encourage Full Feeds with a Calm Environment
To break the snack feeding habit, encourage your baby to take fuller feeds. Create a calm, distraction-free environment during nursing—dim the lights, turn off the TV, and find a quiet spot. A relaxed setting helps your baby focus on eating rather than popping on and off. If they stop after a few minutes, gently encourage them to keep going by stroking their cheek or compressing your breast to stimulate milk flow.
Step 3: Offer Comfort in Other Ways
If your baby is snack feeding for comfort, find alternative ways to soothe them. Cuddles, a soft lullaby, or a pacifier can work wonders. I remember with my second child, a cozy swaddle and a white noise machine became our go-to for non-nursing comfort. Speaking of which, you can find highly rated white noise machines on Amazon—they’re a lifesaver for soothing without nursing!
Checklist: Alternative Comfort Methods
Use this checklist to try new soothing methods! Need a white noise machine? Shop our favorites on Amazon.
Step 4: Introduce a Feeding Schedule
Gradually space out nursing sessions to create a more predictable schedule. For example, if your baby nurses every hour, try stretching it to every 1.5 hours, then 2 hours. Offer a full feed at each session, and if they ask to nurse sooner, distract them with play, a song, or a walk in the stroller. This takes patience, but over time, your baby will adjust to longer intervals between feeds.
Step 5: Watch for Hunger Cues vs. Comfort Cues
Learn to distinguish between hunger and comfort cues. Hunger cues include rooting, sucking on their hands, or fussing with a specific cry. Comfort cues might look like general fussiness, wanting to be held, or reaching for you without clear hunger signs. If it’s comfort they’re after, try other soothing methods before offering the breast.
Step 6: Introduce Solids (If Age-Appropriate)
If your baby is 6 months or older, introducing solids can help reduce snack feeding. A small meal of mashed avocado or banana can make them feel fuller, reducing the need for frequent nursing. Just make sure to follow Pediatrician guidelines—start with one meal a day and gradually increase as they get used to solids. Need baby feeding gear? Check out our top picks for spoons and bibs on Amazon!
Step 7: Be Patient and Consistent
Change won’t happen overnight, and that’s okay. Be patient with your baby—and yourself. Consistency is key, but so is flexibility. If your baby is having a tough day (like during a growth spurt or teething), it’s okay to offer extra nursing sessions for comfort. You’re not failing; you’re meeting their needs with love.
Emotional Support for You During This Transition
Let’s take a moment to talk about you, mama. Stopping snack feeding can bring up a lot of emotions—guilt, sadness, or even relief. It’s normal to feel a mix of all three. Breastfeeding is such a special bond, and any change can feel like a loss, even if it’s the right step for your family.
Let Go of the Guilt
You might worry that reducing snack feeding means you’re taking away something your baby needs. But here’s the truth: you’re not. You’re teaching them new ways to feel secure while ensuring breastfeeding remains a positive experience for both of you. You’re doing an incredible job, and your baby knows they’re loved.
Find Support
Talk to other moms who’ve been through this—it helps to know you’re not alone. Join a local parenting group or connect with our community at BestBabyCart.com. Sharing your journey can make all the difference, and you might pick up some great tips along the way!
Celebrate the Wins
Every time your baby takes a full feed or goes a little longer between nursing sessions, celebrate it! Maybe treat yourself to a cup of coffee or a new book. You’re working hard, and you deserve to acknowledge your progress. This journey is as much about you as it is about your baby.
Common Challenges and How to Overcome Them
Transitioning away from snack feeding isn’t always smooth sailing. Here are some common challenges and how to handle them with grace.
Fussiness and Resistance
Your baby might fuss or cry when you delay a nursing session. This can be hard to hear, but stay calm. Offer a distraction like a toy or a short walk, and reassure them with your voice and touch. They’ll adjust with time.
Engorgement or Milk Supply Concerns
If your baby starts taking fewer but longer feeds, you might experience engorgement as your supply adjusts. Use a warm compress or hand express a little milk to relieve discomfort. Your supply will balance out within a week or two.
Teething or Growth Spurts
During teething or growth spurts, your baby might revert to snack feeding for comfort. That’s okay! Be flexible during these phases, and once they pass, gently guide them back to your new routine.
Conclusion: You’ve Got This, Mama!
Stopping snack feeding while breastfeeding is a journey, but with patience, consistency, and a whole lot of love, you and your baby can find a new rhythm that works for both of you. By encouraging full feeds, offering alternative comfort, and introducing a feeding schedule, you’ll create a breastfeeding experience that’s sustainable and fulfilling. And remember—you’re not alone. At BestBabyCart.com, we’re here to support you with expert advice and the best baby products. Ready to make nursing easier? Shop top breastfeeding essentials like nursing pillows and milk storage bags on Amazon through our site!
FAQ: Your Snack Feeding Questions Answered
Is snack feeding breastfeeding bad for my baby?
No, snack feeding isn’t inherently bad, especially in the early months when babies need frequent feeds. But as they grow, it can lead to unsatisfying feeds and exhaustion for you. Transitioning to fuller feeds can help create a better routine.
How long should a breastfeeding session last?
It depends on your baby, but most full feeds last 10-20 minutes per side. If your baby is nursing for less than 5 minutes and wants to feed again soon, they might be snack feeding.
Can I stop snack feeding without weaning completely?
Absolutely! Stopping snack feeding encourages longer, more satisfying feeds without ending breastfeeding. You can continue nursing while creating a more structured schedule.
What if my baby cries when I delay a feed?
Crying can be tough to hear, but try to stay calm. Offer comfort through cuddles, a song, or a pacifier. If they’re truly hungry, their cues will be more persistent—trust your instincts!
Will stopping snack feeding affect my milk supply?
Your supply might adjust as your baby takes fewer but longer feeds. If you experience engorgement, express a little milk for relief. Your supply will balance out within a few weeks.
Taslima Khanam Sultana, a loving mom of three, founded BestBabyCart.com to help new parents navigate the world of baby products with ease. Her passion for making parenting simpler shines through delivering honest, unbiased reviews on must-haves like diapers, strollers, and feeding gear. Taslima’s mission is to empower families with expert tips, ensuring every product is safe and top-quality for your little one. Drawing from her own parenting journey, she’s dedicated to supporting yours!