
A stroller diaper cake is one of the most practical, memorable baby shower gifts you can make: it doubles as a decorative centerpiece and a ready-to-use stash of newborn essentials, so new parents don’t have to store or return generic gifts they won’t use. Unlike traditional round diaper cakes, this stroller-shaped design is easy to transport, fits neatly on a nursery shelf, and can hold 60–100 diapers depending on size, plus small daily-use items like socks, pacifiers, and travel-sized lotion. After testing this method for dozens of baby shower gifts over the past 5 years, we’ve refined the steps to avoid common structural issues (like wobbly wheels or tilting handles) that cause homemade cakes to fall apart during transport. Whether you’re a first-time crafter or an experienced DIYer, this guide walks you through every step to create a professional-quality stroller diaper cake in under 2 hours.
 A fully assembled stroller diaper cake, ready to gift for a baby shower
Credit: www.youtube.com
A fully assembled stroller diaper cake, ready to gift for a baby shower
Credit: www.youtube.com
What Is a Stroller Diaper Cake?
A stroller diaper cake is a functional baby shower gift built to mimic the shape of a mini baby stroller, using rolled diapers as the primary structural material. Unlike generic decorative cakes, it’s designed to be used after the shower: parents can store the diapers in the tiers, use the attached baby essentials in the first months of their child’s life, and even repurpose the stroller frame as a toy storage bin for small items. Standard 3-tier stroller diaper cakes measure roughly 12 inches tall and 10 inches wide, making them easy to carry and display, while deluxe 4-tier versions can hold up to 120 diapers for parents with multiple children on the way. Practical, usable gifts rank highest on new parents’ wish lists, per AAP guidance on thoughtful baby presents.
Materials You’ll Need
Gathering all supplies before you start will cut down on build time and avoid mid-project trips to the store. We’ve split materials into three core categories, with specific recommendations to ensure your cake is sturdy, safe, and useful.
Diapers & Core Supplies
- 60–80 size 1 diapers (for babies 8–14 lbs, the most common newborn size) for a standard 3-tier cake; use 100+ size 1 or 2 diapers for a large deluxe version. Unopened, name-brand diapers work best, as they hold their rolled shape better than generic options, and parents can use them immediately without worrying about quality. If the parents use cloth diapers, opt for pre-folded cloth diapers rather than all-in-one styles, as they hold their shape far better when rolled.
- A base frame: choose either a small, inexpensive toy stroller (best for beginners, as it provides pre-built wheels and a handle) or a custom cardboard frame (for larger, more custom designs). If using a cardboard frame, you’ll need a 12×12 inch piece of corrugated cardboard for the base, plus a 2-foot long cardboard tube (from a paper towel roll) for the handle support.
- Small baby essentials to tuck between tiers: 2–3 travel-sized baby lotion bottles, 3–4 pacifiers, 2 pairs of newborn socks, a soft baby washcloth, and a tiny board book. Tuck affordable newborn grooming tools like a soft baby hairbrush (affordable newborn grooming tools) between the tiers for extra practicality.
Decorative Supplies
- 2–3 rolls of grosgrain ribbon (1 inch wide) in colors matching the baby’s nursery theme; grosgrain holds its shape better than satin when wrapped around diaper tiers. For gender reveal showers, you can use a gender reveal mystery capsule (gender reveal mystery capsules) filled with pink or blue confetti to hide the cake’s theme until it’s unveiled.
- Faux flowers, small baby-themed stickers, and fabric for the canopy (tulle or soft cotton works best, as it’s lightweight and won’t collapse).
- When selecting decorations, avoid small loose parts (under 1.25 inches in diameter) that pose choking hazards for newborns, per CPSC small parts safety guidelines. Match ribbon and fabric patterns to the baby’s nursery theme (chevron prints are a popular, safe choice for modern nurseries (chevron suitability for baby spaces) if you know the parents’ style. Tuck matching newborn socks (soft baby sock bundles) into ribbon gaps for a cozy, practical touch.
Tools
- 1-inch rubber bands (not the tiny twist-tie style, as they won’t hold rolled diapers securely)
- Low-temp hot glue gun and glue dots (low-temp is safer for fabric and avoids burns)
- Double-sided tape, scissors, and a ruler for measuring ribbon
- Clear cellophane wrap and a large decorative bow for presentation
Stroller Diaper Cake Supplies Worth Having
You don’t need a huge list of supplies to make a stroller diaper cake. A few practical baby items can form the cake itself while also becoming useful gifts for the new parents.
1. Newborn or Size 1 Diapers

- #1 Choice of Hospitals, Nurses and Parents (Hospitals: based on hospital sales data; nurses: vs. other hospital brands, …
- 2x softer with up to 12 hours of protection (vs. the every-day-of-the-year brand)
- Heart Quilts provide our softest comfort ever, while pulling wetness and mess away
Diapers are the main part of the diaper cake, so choose a size the baby can use after birth rather than buying too many newborn-size diapers.
Tip: Size 1 diapers are often a practical choice because babies can outgrow newborn diapers quickly.
2. Receiving Blankets
- 95% Polyester, 5% Elastane
- There are no zippers, no snaps. Our baby blanket will be safe to your baby
- Baby blanket are made of cloth, soft and stretchy knit fabric for extra stretch, they are soft and stretch
Receiving blankets can be rolled or folded into the stroller design and add another useful gift for the parents.
Look for soft, lightweight blankets that are easy to wash and large enough to wrap around the diaper arrangement.
3. Baby Socks or Small Baby Clothes

Baby socks, bibs, washcloths, or a small onesie can be tucked into the diaper cake as little surprises. These items make the finished gift more useful without adding much bulk.
4. Ribbon and Diaper Cake Decorations
A wide ribbon helps hold the finished arrangement together visually and gives the stroller diaper cake a polished look. You can also add a simple baby-shower sign, bow, or other decoration that matches the party theme.
Choose decorations that are easy to remove before the baby items are used.
Quick Buying Tip
If you’re making a stroller diaper cake as a baby-shower gift, prioritize useful baby supplies over decorations. The diapers, blankets, socks, and other essentials can all be used after the celebration, while the decorative pieces can be removed before the gift is opened.
Step 1: Prepare Your Workspace and Roll Diapers
Start by clearing a flat, clean workspace (a dining table works best) and laying out all your materials. Keep diapers in their original packaging until you’re ready to roll them to avoid dust or damage. To roll each diaper tightly: place the diaper flat on the table with the leak leg cuffs facing inward, then roll it tightly from the top (waistband) down to the bottom, pressing firmly to remove air pockets. A tightly rolled diaper will be roughly 3 inches long and 1.5 inches wide, which creates a uniform, stable tier. Secure each rolled diaper with a 1-inch rubber band wrapped around the center, making sure it’s tight enough to hold the shape but not so tight that it tears the diaper material. In practice, most first-time builders make the mistake of rolling diapers too loosely, which leads to wobbly tiers later on, so take extra time with this step to get consistent rolls.
Step 2: Build the Stroller Wheels
The wheels are the foundation of your stroller cake, and a wobbly wheel will throw off the entire structure’s balance. For each wheel, bundle 3–5 tightly rolled diapers together in a circle, securing the outer edge with a wide ribbon to hide the rubber bands and hold the shape. You’ll need 4 identical wheel bundles total for a standard 4-wheel stroller design. Once all wheels are formed, attach them to the base of your stroller frame (either the toy stroller base or cardboard base) using double-sided tape, pressing firmly for 10 seconds to ensure they stick. For extra stability, wrap a thin ribbon around the edge of each wheel and the base to lock it in place. Before moving on, gently nudge each wheel to confirm it doesn’t wobble; if it does, add extra tape or a small dot of hot glue to the base.
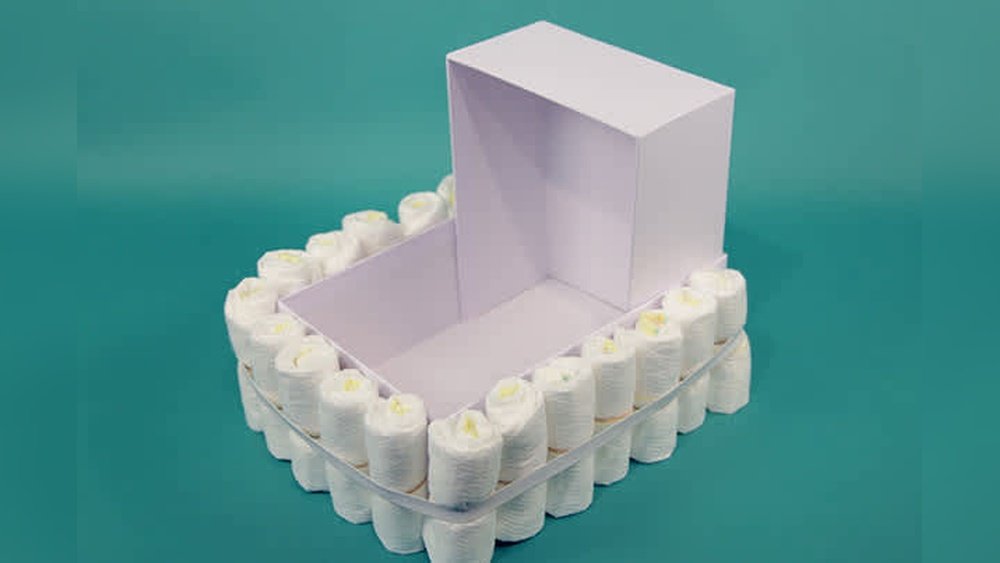
 Diaper rolls secured with ribbon form the wheels of the stroller cake
Credit: www.pampers.com
Diaper rolls secured with ribbon form the wheels of the stroller cake
Credit: www.pampers.com
Step 3: Assemble the Stroller Frame and Tiers
If you’re using a toy stroller base, skip this step and move directly to adding tiers. For custom cardboard builds: insert the 2-foot cardboard tube (handle support) through the center of your 12×12 inch cardboard base, securing it with hot glue so it stands straight. This tube will act as the core support for all your diaper tiers, preventing the cake from tilting. To build the tiers: arrange rolled diapers in a circular shape around the central support tube for the bottom layer, using a wide rubber band or ribbon to hold the circle together. The bottom tier should be roughly 10 inches wide, the middle tier 7 inches wide, and the top tier 4 inches wide, with each layer centered perfectly on the one below it to maintain balance. For extra support, tuck 2–3 extra rolled diapers vertically between the central tube and the outer tier rolls to lock the layers in place. Unlike generic diaper cake builds, this stroller design doesn’t require a separate “handle” tier, as the central tube serves double duty as both support and the stroller handle frame.
Step 4: Add the Handle and Canopy
The handle and canopy are what make your cake look like a real stroller, rather than just a stack of rolled diapers. To build the handle: if you’re using a toy stroller base, adjust the existing handle to your desired height (14–16 inches is standard for a real stroller, matching a real Uppababy Vista (Uppababy stroller handle adjustment) for a hyper-realistic touch. If you’re using a custom cardboard build, wrap the central cardboard tube with grosgrain ribbon to match your theme, then add a small curved piece of cardboard at the top to create the handle grip, securing it with hot glue. Tie a small bow at the base of the handle where it meets the bottom tier to hide any rough edges. For the canopy: cut a 12×18 inch piece of tulle or soft cotton into a semi-circle shape, then drape it over the top of the cake, securing the edges to the top tier with glue dots. Shape the fabric to curve gently over the diaper tiers, just like a real stroller canopy, and tuck small faux flowers or a tiny baby toy into the front edge for decoration. Avoid heavy fabrics like fleece, as they will collapse the shape of the tiers.
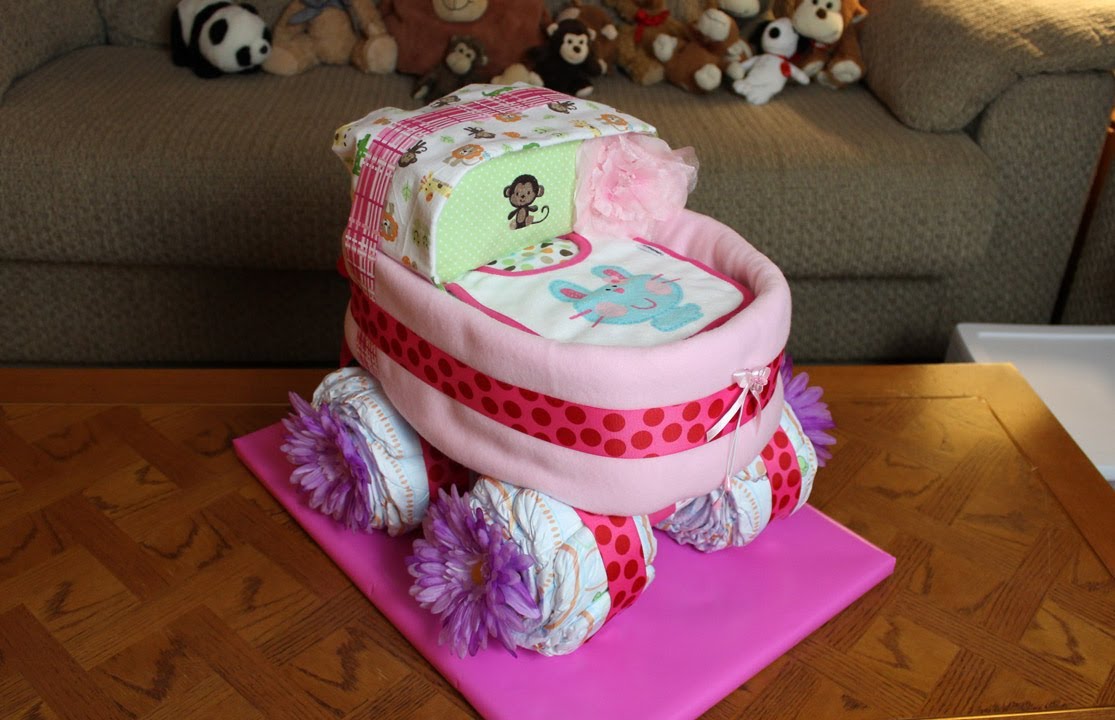 The final decorated cake with fabric canopy and wrapped handle
Credit: www.youtube.com
The final decorated cake with fabric canopy and wrapped handle
Credit: www.youtube.com
Step 5: Decorate and Add Practical Baby Essentials
Now it’s time to add personal touches that make the cake feel special for the new parents. Start by wrapping a wide ribbon around each tier to hide the rubber bands holding the diapers together, tying a small bow at the front of each tier for a polished look. Add extra decorations like faux flowers, baby-themed stickers, or small baby items (pacifiers, tiny socks) tucked into gaps between ribbons. For extra practicality, tuck small, usable baby essentials into the stroller “basket” (the space between the bottom tier and the wheels): a set of 3 tiny silicone plates for baby-led weaning (baby plate buying guide), a pack of newborn nail files, or a small tube of diaper rash cream. Unlike generic decorative gifts, these items save parents from having to buy small, easy-to-forget essentials in the first chaotic weeks of parenthood.
Step 6: Secure and Present Your Cake
Once all decorations are added, do a final check to make sure all tiers, wheels, and the handle are secure: gently shake the cake side to side to confirm nothing wobbles or shifts. If any parts feel loose, add extra hot glue or ribbon ties to lock them in place. To present the cake: place it on a 14×14 inch decorative tray or thick cardboard base, then wrap the entire cake (excluding the handle, if you want it to be visible) in clear cellophane to protect it from dust and damage during transport to the shower. Tie a large bow around the cellophane at the base of the handle for a finished look. If you’re transporting the cake in a car, place it on the floor of the backseat (not a seat, where it can slide around) and wedge it between two heavy items to keep it upright.
Pro Tips for a Long-Lasting, Impressive Cake
- Build the cake 1–2 days before the baby shower, not the same day: rolled diapers hold their shape better when they have time to settle, and you won’t be rushed on the day of the event.
- Avoid using fresh flowers in your decorations, as they can wilt and shed pollen onto the diapers; opt for high-quality faux flowers instead for a long-lasting finish.
- If you’re using a toy stroller base, remove any small plastic parts (like the stroller’s original wheels, if they’re loose) before adding the diaper wheel bundles to avoid choking hazards.
- For parents who have specified a nursery theme, pull colors and patterns from their registry (if available) to make the gift feel extra personalized.
Frequently Asked Questions
What materials are needed to make a stroller diaper cake?
You’ll need 60–80 size 1 disposable diapers (or 40–50 pre-folded cloth diapers), a base frame (toy stroller or custom cardboard), grosgrain ribbon, faux flowers, baby-safe adhesives, small baby essentials (pacifiers, socks, lotion), and basic tools (rubber bands, hot glue gun, scissors). Avoid small loose decorations that pose choking hazards for newborns, per CPSC guidelines.
How long does it take to make a stroller diaper cake?
A standard 3-tier stroller diaper cake takes 1–1.5 hours to build for first-time crafters, and 45 minutes for experienced builders. Adding intricate decorations or a custom cardboard frame can add 30–45 minutes to the total build time. Gathering all materials before you start will cut down on total time significantly.
Can I customize a stroller diaper cake for different themes?
Yes, you can customize the cake for any baby shower theme: use team-colored ribbons for a sports-themed shower, pastel pink and blue for a gender reveal, or neutral earth tones for a minimalist nursery. You can also add personalized elements like a small sign with the baby’s name (if it’s been announced) or a photo of the parents attached to the handle.
Can I use cloth diapers instead of disposable diapers?
Yes, but opt for pre-folded cloth diapers rather than all-in-one styles, as they hold their rolled shape better. Plan for 40–50 cloth diapers for a standard 3-tier cake, and note that new parents may prefer disposable diapers if they haven’t settled on a cloth routine yet. If you do use cloth diapers, make sure they’re brand new and laundered before adding them to the cake.
How do I transport a stroller diaper cake safely?
Wrap the cake in clear cellophane and place it on a flat, non-slip surface in your vehicle (the floor of the backseat is best). Wedge it between two heavy items (like a gift bag or a cooler) to prevent it from sliding around, and avoid placing it on a car seat where it could tip over during sudden stops.
Conclusion
A stroller diaper cake is far more than a pretty baby shower centerpiece: it’s a practical, thoughtful gift that gives new parents exactly what they need in the first months of their child’s life, without the clutter of generic, unused gifts. With the step-by-step guide above, you can build a sturdy, beautiful cake even if you have no prior crafting experience, and customize it to match the parents’ style and needs. Ready to craft a standout baby shower gift? Grab your supplies and follow this guide to make a stroller diaper cake that’s both beautiful and deeply practical for new parents. For more unique DIY baby shower ideas and newborn care tips, browse our full library of baby craft and parenting guides.

Emma Grace is a devoted mother and passionate content writer at BestBabyCart.com. With firsthand parenting experience and a love for research, she creates helpful guides and honest reviews to support parents in choosing the best for their babies. Her goal is to make parenthood easier, one article at a time.