Most car seats expire between six and ten years from the manufacture date.
I have worked with parents, safety technicians, and child passenger safety programs for years, so I know the real-world reasons behind car seat lifespans. This guide explains how long is a car seat good for, why seats expire, how to check your seat, and practical tips to keep children safe. Read on for clear rules, useful examples, and hands-on advice you can use today.
How long is a car seat good for?
Car seats usually last six to ten years from the manufacture date. The exact time depends on the model, materials, and maker. Infant-only seats often expire sooner than convertible seats. Booster seats can have longer or similar life spans. Remember that an expired seat may not protect a child properly. I repeat: if you ask how long is a car seat good for, check the label for the manufacture and expiry dates.

Why car seats have expiration dates
Seat parts wear out over time. Fabrics fade and harness webbing can weaken. Plastic can get brittle from heat and sunlight. Safety rules and testing change over the years, so older seats may not meet current standards. Manufacturers set an expiration to limit risk and to push updates that improve crash protection. When you wonder how long is a car seat good for, these are the main reasons behind the clock.

Typical lifespan by seat type
Here are common ranges you will see when you ask how long is a car seat good for:
- Infant-only seats: 4 to 6 years from manufacture.
- Convertible seats: 6 to 10 years from manufacture.
- All-in-one seats: 6 to 10 years from manufacture.
- Booster seats: 6 to 10 years, sometimes longer for simple backless boosters.
These ranges are broad. Always follow the label and the user manual for the exact limit for your model.

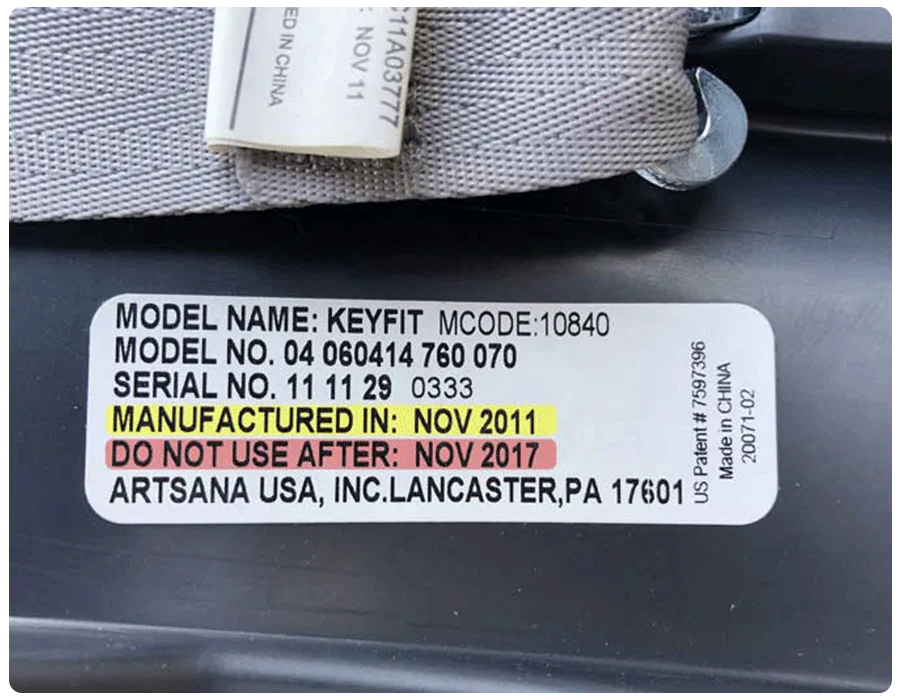
How to find the expiration or manufacture date
Finding the date is simple if you know where to look. Steps to check your seat:
- Check the sticker on the base or shell for a “manufacture date” or “expiry” label.
- Look inside the seat shell near the belt path or under the padding for stamped dates.
- Keep the manual; it usually states the lifespan and how to read the label.
- If the label is missing or unreadable, contact the manufacturer with the model and serial number.
If you can’t find a date, treat the seat as suspect and consider replacing it. This answers the common question of how long is a car seat good for when the label is gone.
:max_bytes(150000):strip_icc()/prt-britax-highpoint-2-stage-belt-positioning-booster-seat-mike-navarro-39-9b3e13cb7cc34f8ea90c5b65847625c2.jpeg)
Signs a car seat is no longer safe
You don’t always need the expiry date to know a seat is unsafe. Look for these signs:
- Cracks or stress marks in the plastic shell.
- Frayed, faded, or stiff harness webbing.
- Missing parts, buckles that don’t latch, or sliders that bind.
- Seat was involved in a moderate or severe crash.
- Manufacturer recall notice with no fix available.
If you see these signs, stop using the seat and replace it. Asking how long is a car seat good for helps, but visible damage often shortens that time.

After a crash or when buying used
One crash can change a seat’s safety. Most manufacturers say to replace the seat after a moderate or severe crash. Even minor crashes can hide damage you can’t see. Buying used seats has pros and cons:
- Pros: lower cost, access to high-end models for less.
- Cons: unknown crash history, missing labels, wear and age.
If you buy used, get the manual, confirm the manufacture date, check for recalls, and know the seat’s full history. If you ask how long is a car seat good for in the used market, prioritize seats with clear labels and no crash history.

Maintenance and storage to extend safe life
Good care can help a seat last its intended lifespan. Simple steps I recommend:
- Register the seat with the maker to get recall alerts.
- Store the seat indoors in a dry, cool place when not in use.
- Avoid prolonged sun exposure and extreme heat in cars.
- Clean according to the manual; replace harnesses and pads only if allowed.
- Keep written records of purchase, installation dates, and any crashes.
These actions won’t change the expiration date, but they reduce extra damage and help you know when to replace a seat. If you wonder how long is a car seat good for, care and storage matter.

Personal experience and practical lessons
I once inspected a convertible seat that looked fine but had small, hairline cracks hidden under the padding. The owner thought the seat was okay because it was clean and had a recent-purchase look. After removing the cover, the cracks were clear. We replaced the seat immediately. Lesson learned: visual checks must include the shell and harness. Keep manuals and labels. Register seats and replace them when in doubt. When families ask how long is a car seat good for, I advise a cautious approach: replace early rather than risk a compromised seat.

Frequently Asked Questions of how long is a car seat good for
How do I read the expiration date on my car seat?
Look for a sticker or molded date on the shell or base. If the label lists a manufacture date and a lifespan, add the lifespan to the manufacture year to find the expiry.
Can a car seat be used after a minor car accident?
Most makers recommend replacement after a moderate or severe crash. For minor crashes, check the manual and manufacturer advice; when in doubt, replace it.
Is it safe to buy a used car seat?
You can buy used seats if the seat has no crash history, has readable labels, and comes with the manual. Avoid seats with missing parts or unknown history.
Do booster seats expire?
Yes. Booster seats also have manufacture dates and expiry periods. Check the label and manual to know how long is a car seat good for for your booster.
Can I replace parts like the harness or shell to extend a seat’s life?
Some manufacturers sell replacement parts, but you should only use approved parts. Replacing major components can be risky and may void safety. Check the manual or contact the maker first.
Conclusion
Car seats have clear lifespans for good reasons: materials age, standards evolve, and unseen damage can reduce protection. Check the manufacture and expiration date, watch for damage, replace after a crash per manufacturer advice, and avoid unknown used seats. Take action today: inspect your child’s seat, register it, keep the manual, and mark the expiry on your calendar. If you found this helpful, subscribe for more safety guides or leave a comment with your questions.

Sophia Linda is a freelance writer and Certified Health Coach based in the Newbury Park, CA. Passionate about healthy living, she focuses on helping families stay active and connected to the outdoors. Together with her husband and their three young children, Sophia spends much of her time traveling, hiking, and camping. Her work has been featured on the bestbabycart blog, and she brings a practical, real-world perspective to reviewing baby products for parents.