

Struggling to remove your Chicco booster seat during carpool drop-off, a last-minute errand, or a deep car cleaning? You’re not alone: many parents find themselves fumbling with release buttons and tangled belts in the school pickup line, rushing to get the seat out before the bell rings. Chicco is one of the most popular booster seat brands on the market, with top 2026 models like the GoFit Plus, KidFit, and backless GoFit, but their release mechanisms can be tricky if you’re unfamiliar with the design. This step-by-step guide covers every current Chicco booster model, walks through pre-removal safety checks, and troubleshoots common stuck parts so you can get the seat out in 2 to 3 minutes, no special tools required. We’ll also cover post-removal care to keep your seat safe for years of use.
Before You Start: Pre-Removal Prep
Skipping pre-removal checks is the most common cause of broken parts or safety risks, so spend 30 seconds on these steps before you touch the seat. You can also read our guide on best booster car seat for sleeping top picks for comfortable travel.
Confirm Your Booster Model & Installation Type
Chicco makes both high-back and backless booster seats, and removal steps vary slightly between the two. High-back models (like the GoFit Plus) have an adjustable headrest, foldable backrest, and often removable cup holders, while backless models are a low-profile base with armrests only. You’ll also need to note how the seat is installed: most use either the vehicle’s lower LATCH anchors (no seat belt needed) or the vehicle’s lap-shoulder/lap seat belt routed through the booster’s belt path guides. If you’re unsure, check the label on the bottom of the seat for model number and installation instructions.
Safety First: Non-Negotiable Pre-Checks
Always park your vehicle on level ground, engage the parking brake, and turn off the engine before starting. Clear the backseat of loose toys, snacks, or pets that could fall or get caught during removal. If your child uses the booster, confirm it is empty before lifting. It’s also critical to check the seat’s expiration date (printed on a label on the bottom of the base) and recall status via the NHTSA’s recall lookup tool before handling it: most Chicco boosters expire 6 to 10 years after manufacture, and expired seats should be disposed of, not reused. You can also read our guide on best memory foam car seat cushion.
Tools You’ll Actually Need
Contrary to common myth, no special tools are required for standard Chicco booster removal. Clean, dry hands are all you need for most models. A small flashlight is only necessary if you’re working in a dark garage, and a flathead screwdriver is only useful if LATCH release buttons are stuck (we cover that fix in the troubleshooting section). If your high-back booster has a removable cover, you may want to unzip it first to avoid snagging fabric during removal.
Key Chicco Booster Components to Identify
Understanding your seat’s parts will prevent damage and speed up the removal process.
High-Back vs. Backless Booster Parts
High-back Chicco boosters include a reinforced plastic frame, padded headrest and backrest, armrests, a belt path guide for the vehicle’s seat belt, and either LATCH connectors on the base or a seat belt routing system. Backless models have a lower profile, with a flat base, armrests, and a belt path guide only; they do not have a backrest or headrest, and are only rated for children 4+ years old and 40+ pounds per NHTSA guidelines. You can also read our guide on best convertible child safety car seats for ultimate comfort and protection.
Fastening Mechanisms for Chicco Boosters
All Chicco boosters use one of two fastening systems:
- LATCH connectors: These are the lower anchor attachments only (boosters never use top tethers) located on the base of the seat. Each connector has a red or grey release button that disengages it from the vehicle’s lower anchor.
- Seat belt path: For belt-installed models, the vehicle’s seat belt is routed through plastic guide tabs on the side or back of the booster to hold it in place. There are no locking clips or extra parts to remove for belt-installed models, just the belt itself.
 This Chicco GoFit Plus is installed via the vehicle’s lower LATCH anchors, the most common installation method for 2026 models.
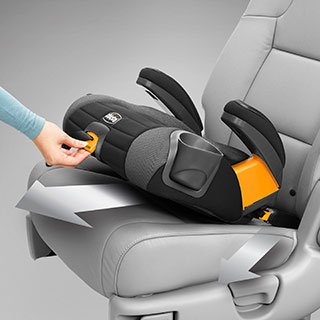 Refer to your seat’s manual to match the release clips and belt path to your specific Chicco booster model.
Step-by-Step Removal for Any Chicco Booster
Follow the steps below that match your installation type for a smooth, damage-free removal.
For LATCH-Installed Boosters
- Locate the LATCH release buttons on the side or front of the booster base. These are usually marked with a release symbol or printed with “Press” text.
- Press and hold each release button firmly while gently wiggling the seat side to side. You will hear a click when the connector disengages from the vehicle’s lower anchor.
- Pull the seat up 1 to 2 inches to confirm it is fully disconnected from both anchors.
- Lift the seat straight up and out of the backseat, taking care not to snag the connectors on the seat crease or vehicle trim.
For Seat Belt-Installed Boosters
- Fully unbuckle the vehicle’s seat belt, pulling the entire length of the belt out of the booster’s guide tabs. For high-back models, make sure the belt is free of the headrest adjustment slots.
- Pull any remaining slack out of the belt to ensure it is not caught under the seat.
- Lift the seat straight up and out of the backseat.
Removing High-Back Boosters for Compact Storage
If you need to store the seat in a small space, fold the backrest down first using the release lever on the side of the headrest. Most Chicco high-back boosters fold flat in 1 second, making them easy to tuck in a closet or trunk.
Post-Removal Care & Storage Tips
Proper care after removal will extend your booster’s usable life and keep it safe for future use.
Inspect for Damage Before Storing or Reinstalling
Check the entire seat for:
- Cracks, warping, or breaks in the plastic frame
- Fraying, tears, or stretched webbing on the belt path guides
- Torn or compressed padding on the seat or armrests
- Bent or damaged LATCH connectors If you find any of these issues, stop using the seat immediately and contact Chicco support to see if it is repairable or needs to be replaced. We also recommend confirming the seat still matches your child’s current height and weight requirements before reinstalling it. You can also read our guide on how to convert graco 4ever car seat to backless booster.
Clean the Seat During Removal
If the seat’s cover is removable, unzip it and machine wash it per the label instructions. For non-removable covers, wipe down the plastic and fabric with a mild soap and damp cloth, then air dry completely before storage. Avoid harsh chemical cleaners, bleach, or abrasive sponges, as these can degrade the seat’s flame-resistant materials. If you use custom covers for your vehicle’s seats, follow the same gentle cleaning routine you’d use for custom car seat covers to preserve their quality.
Safe Storage Practices
Store the booster in a cool, dry place away from direct sunlight, extreme temperatures, and heavy items. Avoid attics, garages, or car trunks where temperatures fluctuate drastically, as heat and cold can warp the plastic shell and weaken the webbing, just like you’d plan seasonal baby layers appropriately for extreme weather. If storing for more than 3 months, cover the seat with a breathable cotton bag to prevent dust buildup, and avoid stacking heavy items like diaper bags or extra baby dishware on top of it to prevent frame warping. If you’re switching to a different car seat type for your growing toddler, you can fold the booster for compact storage using the same techniques you’d use for folding baby gear for travel. You can also read our guide on can you put seat covers on heated car seats.
Reinstallation Best Practices
When you put the seat back in your vehicle, double-check that the belt path is free of twists, LATCH connectors are fully locked (you’ll hear a second click when they are secure), and the seat does not move more than 1 inch side to side when pushed at the belt path. For belt-installed models, confirm the lap belt is low across your child’s hips, not their stomach, and the shoulder belt crosses the middle of their chest, not their neck.
Troubleshooting Common Chicco Booster Removal Issues
Even with proper prep, you may run into these common snags:
Stuck LATCH Release Buttons
A common mistake parents make is pressing the release button too hard instead of pressing and holding it. If the button won’t budge, wiggle the seat side to side while holding the button firmly to release tension. If it’s jammed with crumbs or debris, clear it with a dry cloth first—never use lubricants, as they can damage the plastic and pose a risk to your child, a hazard we cover in our guide to common car seat safety mishaps. If the button still won’t release, you may need to use a flathead screwdriver to gently pry it, but take care not to break the plastic housing. You can also read our guide on best dog car booster seat.
Seat Belt Stuck in the Booster Path
If the vehicle’s seat belt is stuck in the booster’s guide tabs, pull the belt as taut as possible to release tension, then use a blunt object like a pen cap to gently guide the belt out of the tabs. Never cut the belt or use excessive force, as this can damage the booster’s plastic guides.
Seat Won’t Lift Out After Disconnecting
If the seat is caught after you’ve released the fasteners, tilt the front of the seat up slightly to clear the vehicle’s seatbelt receiver or the crease of the backseat. Check under the seat for loose change, toys, or other small items that may be blocking the removal path. If you’re removing the seat for a long trip, you may also want to check the padding for tears or worn foam, just as you’d vet safe crib bedding materials for your baby’s sleep space to avoid suffocation risks. You can also read our guide on best car booster seat for short adults enhance comfort and view effortlessly.
 Press and hold the LATCH release button firmly while wiggling the seat to disengage stuck connectors.
Frequently Asked Questions
Do I need tools to remove a Chicco booster seat?
No special tools are required for standard removal. You only need your hands to release LATCH clips or unbuckle the vehicle’s seat belt. A flathead screwdriver may help if LATCH buttons are stuck, and a flashlight is useful for dark garage spaces, but these are optional.
Can I remove a Chicco booster seat by myself?
Yes, all Chicco booster models are designed for one-person removal. Just ensure the vehicle is parked on level ground with the parking brake engaged, and no children or pets are in the backseat during the process. This process is perfect for busy parents juggling tight baby schedules who need to switch boosters between cars quickly. You can also read our guide on best car seat booster for adults elevate comfort driving view effortlessly.
How do I know if my Chicco booster is installed with LATCH or a seat belt?
Check the base of the seat: if you see plastic LATCH connectors attached to the vehicle’s lower anchor points, it’s LATCH-installed. If the vehicle’s seat belt is routed through the booster’s belt path guides, it’s seat belt-installed. For exact locations of release buttons and belt paths for your specific model, refer to Chicco’s official support library for downloadable manuals and video tutorials.
Is it safe to uninstall a booster seat temporarily?
Yes, as long as you follow proper removal steps and store the seat safely. Always reinstall it correctly before transporting a child, and inspect it for damage before each use. Always defer to both your seat’s printed manual and NHTSA’s official car seat safety guidelines for region-specific installation and removal rules, as requirements vary slightly by state and vehicle type. You can also read our guide on how to keep newborn head up in car seat.
How often should I remove and inspect my Chicco booster seat?
We recommend removing and inspecting your booster every 3 months, or after any long trip, to check for wear, damage, or loose parts. This is also a good time to clean the seat and verify it still matches your child’s current height and weight requirements.
Final Safety Reminders
Removing your Chicco booster seat doesn’t have to be a frustrating, time-consuming task. By following these model-specific steps, performing regular inspections, and storing the seat properly, you’ll extend its usable lifespan and keep your child safe on every ride. Remember to always follow the manufacturer’s instructions for your specific model, and never use a booster that is expired, recalled, or damaged. For a free, certified car seat safety check to confirm your booster is installed correctly when you put it back, use the NHTSA’s car seat inspection station locator to find a technician near you. You can also read our guide on best booster car seat with back top picks for safety and comfort.

Emma Grace is a devoted mother and passionate content writer at BestBabyCart.com. With firsthand parenting experience and a love for research, she creates helpful guides and honest reviews to support parents in choosing the best for their babies. Her goal is to make parenthood easier, one article at a time.